Marking Time Sculpture, Bronllys Hospital, one year on.

To get the best out of our modest budget we used some new techniques and on my 1 year maintenance visit to this the lovely site I was hugely pleased to see they have worked really well. Despite a very harsh winter the sculpture looks fresh and is weathering in a uniform, gentle way. The moss is slowly collecting in the deep textures as planned.

The lovely, thoughtful planting has re-grown beautifully, complimenting the form perfectly, softening the site and integrating it into the lovely woodland which is overflowing with flowers and birds.

The paths are still level, easy for patients to use and now look like they have been there forever.

While I was there working a lot of people strolled by. They said this had become their sanctuary, a moment of peace and escape from the pressures in the hospital, where they could revive. This is exactly what we wanted. A wonderful result.

Everyone is welcome to visit this stunning spot at Bronllys Hospital grounds in Powys, Wales.

You can read the whole story of this wonderful project, including how the sculpture was designed with local people and built at Osprey Studios, in the other Marking Time posts here on this site.

The Landscape Series.

This Series is a collaboration with Photographer and Documentary Cameraman Stephen Foote.   Click on any picture to see it full size.

Stephen Foote and I met up after 30 years in 2014. We were good friends as teenagers, both rather disengaged with school, both making art in our own time. 30 years on we both still use art work as a major part of our interaction with this nutty world. Sharing our images was a key way we got to know each other again and harnessing that process in a joint project was simply a way of capturing what was occurring naturally. We set a straightforward ” Artists Respond to Landscape ” brief and kept a very open mind while we walked, talked, Steve took pictures and I just took it all in. We met every few months and sent each other pictures of the ensuing work in-between times.

Steve is also a Cameraman and was involved in filming for Panorama during the early, very heated phase in Kiev and the Crimea. I was coming to the end of the Up Is Down Series . Our first visit was Bracelet Bay, Mumbles, Swansea. Then we went into Porth Yr Ogof caves and had a mind-blowing day for me; we spent hours in the dark, natural cave while Steve took a fab series of photographs. I stood in the river in the darkness, held the lights and listened to the flow of water, felt the under-ground breezes. From there the project clarified for us as the travels of the water from the sky above the Brecon Beacons to the river, especially the Tawe, on down to the wide bay at Swansea, and out into the Ocean where much of it will return to the clouds and begin the circle again. As it flows it leaves it’s mark on the stone, the ground, the life it passes.

These pictures are roughly in sequence for the progression of work over time, with Steve’s photos next to the related sculptures in some cases.

1981984_10203331966200635_1180227792_n_F147928_F146711_F148822_F148792

Rebecca Buck, Osprey Studios

Wyvern, 10cm H x 18cm L x 11cm D.

Rebecca Buck, Osprey Studios

Wyvern, 10cm H x 18cm L x 11cm D.

Wyvern X, 21cm L x 12cm H x 11cm D.


Water and Stone, Bracelet Bay, 2014, 24cmH x 56cm L x 33cm W, Marbled architectural ceramic.

Water and Stone, Bracelet Bay, 2014, 24cmH x 56cm L x 33cm W, Marbled architectural ceramic. Photo by Stephen Foote

Stephen Foote; Dunes

Stephen Foote; Dunes

Bracelet Bay, Mumbles, Swansea by Steve Foote

Bracelet Bay, Mumbles, Swansea by Steve Foote

in progress, July 2014

Wyvern I in progress, July 2014. 68cm H x 64cm W.

Bracelet Bay, Mumbles, Swansea by Steve Foote

Bracelet Bay, Mumbles, Swansea by Steve Foote


Bracelet Bay, Mumbles, Swansea by Steve Foote.

Bracelet Bay, Mumbles, Swansea by Steve Foote.

It was this fabulous picture of Bracelet Bay that shifted me abruptly into figures, much to my own surprise. The character of the Wyvern developed while making the public sculpture the Balarat Pit Marker in The Edge Series: the coal, a buried treasure to be used wisely or there would be consequences, watched over by a shape-shifting Welsh dragon.

Busts in progress, Aug 2014.

Wyvern busts in progress, Aug 2014.

Here the Wyvern is a guardian of stone.

_F149565

Wyvern V, 2015, 27cm H x 51cm L x 25cm D, black ceramic. Cavin Morris Gallery, New York.

_F149575

Wyvern V, 2015, 27cm H x 51cm L x 25cm D, black ceramic. Cavin Morris Gallery New York.

_F148027

Porth Yr Ogof Cave, Brecon Beacons, by Steve Foote, 2014. We spent hours down here and as I assisted the photography, standing in the river and pitch black, I felt the underground wind and heard all the sounds of water travelling through the rocks. Extraordinary. A living, breathing world of unparalleled beauty.

_F148012

Bracelet Bay, Mumbles, Swansea by Steve Foote

_F147944

Bracelet Bay, Mumbles, Swansea by Steve Foote

_F147861 (1)

Bracelet Bay, Mumbles, Swansea by Steve Foote

OLYMPUS DIGITAL CAMERA

The Wyvern III, 2014

Rebecca Buck Osprey Studios

Wyvern II, 2014, 69cm H x 54cm W, x 31cm D, ceramic. Photo Stephen Foote.

OLYMPUS DIGITAL CAMERA

The Wyvern IV, Sept 2014

OLYMPUS DIGITAL CAMERA

The Wyvern and The Leviathan. in progress, Sept 2014.

_F148835_F147916_F147947_1020888

_F149441

Wyvern VIII, 2015, 39cm H x 71cm L x 34cm D, ceramic. Cavin Morris Gallery New York.

_F149423

Wyvern VIII, 2015, 39cm H x 71cm L x 34cm D, ceramic. Cavin Morris Gallery New York.

_F149448

Wyvern VIII, detail. Photo Stephen Foote.

Rebecca Buck Osprey Studios

Wyvern VIII, Cavin Morris Gallery New York. Photo Stephen Foote.

_F147762_F148186_F149794

Water moves from one sphere to the next in all it’s forms, changing everything it passes. On heavy, stormy days here in the Brecon Beacons it careens in sheets 10cm deep across the grassy hills, colliding in the streams and rivers to tear down towards Swansea Bay. It drops through the gaps and cracks it has left in the stone to the fabulous caves it has been cutting for Millenia. Standing out in the middle of all this you can see the mountain ponies, uncompromising, resolute and beautiful. They became the Guardian of the water, the Leviathan, in it’s mountain form.

_F149706

Leviathan V, 2015, 11.5cm H x 25cm L x 9.5cm W, ceramic. Photo Stephen Foote.

_F149704

Leviathan VI, 2015, 12.5cm H x 21cm L x 8cm W, ceramic. Cavin Morris Gallery New York.

_F149707

Leviathan V, 2015, 11.5cm H x 25cm L x 9.5cm W, ceramic. Photo Stephen Foote.

OLYMPUS DIGITAL CAMERA

The Wyvern and the Osprey, 2014.

The Osprey followed as the guardian of the sky.

_F148170

Stephen Foote Photography.

_F149506

Osprey II, 65cm W x 50cm H. Photo Stephen Foote.

_F149503

Osprey II, 65cm W x 50cm H. Photo Stephen Foote.

_F148669

Osprey I, 40 cm W x 25cm H.Photo Stephen Foote.

Steve’s landscape photos unify everything exquisitely, portraying a vivid place with such clarity you can feel it around you. My sculptural response inevitably, and with some regret, separated the features which got me thinking more carefully about their connections.

The  sphinx-like form and majesty of the Brecon Beacons also showed up first in the Balarat Pit Marker. A classic sculptural motif, the reclining  figure, with it’s many options for themes. Like the complex internal aspect of the Beacons complete with breath, life (water) running through veins in the rock, hidden secrets, moods, supporting of forests, wildlife, and us since the dawn of time. The subtlety of age: the Beacons are especially ancient and have been many things in their past. ‘The Land’ sculptures are about this part of what we saw.

_F149767_F149751_F149774_F149776

Rebecca Buck Osprey Studios.

The Land II, 21cm H x 52cm L x 27cm D. Cupola Contemporary Art, Sheffield, UK.

Rebecca Buck, Osprey Studios

The Land VIII, 21cm L x 12cm H x 11cm W.

Rebecca Buck, Osprey Studios.

The Land III, 15cm H x 43cm L x 12cm D.  

Rebecca Buck, Osprey Studios.

The Land IV, 15cm H x 26cm L x 14cm D.

Rebecca Buck, Osprey Studios.

The Land I, 24cm H x 65cm L x 19cm D.


At this point the Series branches off into new territory lead by images and news about Climate Change rather than Steve’s photos and my local landscape. I have been following the fascinating progression of Climate Change for 35 years. At last it is a main-stream subject. It’s intriguing how people are still trying to avoid seeing it, the deniers but mostly the avoiders. My guilty secret is that I see it as thrilling: nature rejoicing in it’s power and spectacular magnificence, the wonder of transformation. Throwndown at Hoedown is an ongoing Series now.

This fascinating article by Randall Morris about Masks describes the process that I am trying to work through here. I have learnt a great deal from Randall since joining Cavin Morris Gallery. His amazing collection and beautiful writing brings clarity to, and pin points the essence of, what is important in art. I am an animist by nature and it is my job to portray what I see but the distractions can be over-whelming.

Short essay by Randall Morris

The Up is Down Series  proceeded The Landscape Series and was a transitionary point in how I put together forms, particularly in relation to their bases. The research involved clarified my thinking and ability to see.

Most of the sculptures in The Landscape Series are built with the technique explained in Heads and clay armatures.

Pennard Primary Lead Creatives Project, part 3.

The upper part of Pennard Primary School’s sculpture is complete, cut into sections and drying. It has been a joy to build. The pupils panels and tiles for the lower half are drying beautifully. I’m putting together the Book now and it’s lovely to review the wonderful time we had with this fabulous group.

Studio Diary: The Marking Time Sculpture at Bronllys Hospital, Powys, part 9.

The Installation.

I was really lucky to be working with the wonderful, resourceful, ingenious Gareth Ellis from Green Valleys. He has the patients of a saint. The writer Mark Christmas gave a huge amount of time and hard labour in addition to his years-long dedication to this project and this poem which will be set at the entrance to the woodland walk:

                                                                                        Catching a Moment

                                                                                               Within these woods

                                                                                       there is a breath to be found

                                                                               to ease new life into sight and sound

                                                                           transforming our world and how we see

                                                                           each branch, each twig, each living tree

                                                                                   so when the hurt inside we feel

                                                                               creates distraction with no appeal

                                                                        take a walk on this path to find this rhyme

                                                                            you will no longer be ‘Marking Time.’

                                                                                                                   Mark Christmas, 2015.

                                                                                                                   Dedicated to those who understand.

Because vehicles could not pull up to the site, the budget was tight (having been well squeezed by this point as is my habit!) and we couldn’t be too sure who would be able to join us we used a slightly different installation method than in previous sculptures.

We fixed the triangle of heavy railway sleepers securely, dug down 20 cms and then packed in hollow breeze blocks.

The first sections were put in place using the paper template of the mosaic and corner tiles, steel rebars hammered down through the sections and well into the ground and then post-crete was poured into all available gaps and half way up inside the first 3 sculpture sections.

Gareth Ellis and Mark Christmas. Marking Time, Bronllys Hospital, Powys.

The second sections were braced in place using blocks/ wood/ prayers, rebars set, post-crete poured.

Mark Christmas working on the Marking Time Sculpture, Bronllys Hospital, Powys.

The mosaic was built in the studio in 3 sections to aid handling and set securely in place with concrete going right down into the breeze block hollows. The mosaic tiles and the triangle corner-tiles were beautifully made by pupils in Ross Bennett’s Art Department at Llandrindod High School.

Marking Time, Bronllys Hospital, Powys.

Me adding the finishing touches to the mosaic, Marking Time, Bronllys Hospital, Powys.

Mark Christmas brought in poet Emma nan Woerkom to take some lovely photos and create this beautiful poem that has been cut in brass for the site.

Marking Time, Bronllys Hospital, Powys.

All the visible cement (pointing etc) was done with a white cement/gold sand mix that matches the fired colour of the Scarva ES50 clay perfectly. On the floor we topped it with light brown flint chippings and extra, handmade blue mosaic tiles and glass to soften the edge of the mosaic.

Marking Time, Bronllys Hospital, Powys.

Finishing touches on the sculpture were done with Milliput and the golden cement.

Marking Time, Bronllys Hospital, Powys.

Mick Farell has been a key part of this project and he was wonderfully supportive during the installation. His enchanting poem, written especially for the sculpture completes the triangle.

                                                                                               We are the child of nevermind

                                                                                             Who, finding dreams lost, unfind

                                                                                      Who, wandering, walking paths unknown

                                                                                               to find a woodland overgrown

                                                                                           And seeing in that woodland Glen

                                                                                              The happy minds of nevermen

                                                                                           Who elfin laughter laughly speak

                                                                                             Of how we humans keenly seek

                                                                                               Some new haven overhewn

                                                                                               And child stars of the moon

                                                                                                                                           Mick Farrell, 2016.

The poem tiles were made by the same fabulous pupils at Mount Street Junior School that developed the theme with me last year ( see Part 1)They are fixed to the sleepers with tile adhesive and screws.

We have spent a great deal of time on this one and it has been worth it. The Team have been a joy to work with and the whole woodland site looks really beautiful. Gareth Ellis and Mick Farrell will put in the benches and place and secure some tree-trunk logs. This is going to be such a calming, peaceful place for people involved with the Hospital to rest and revive.


Studio Diary: The Marking Time Sculpture at Bronllys Hospital, Powys, part 8.

The cut sections had a slow dry for a month and the last 6 weeks in a tent with the dehumidifier. Water is still collecting!! Soon I’m going to have to start the firing. But if the sections are still damp they will explode into a trillion smithereens….


Rebecca Buck, Osprey Studios.


The letter tiles look great.

Rebecca Buck, Osprey Studios.

Pennard Primary Lead Creatives Project.

Rebecca Buck Osprey Studios

Daniel Buck at Pennard Castle, Gower.

The Lead Creative Schools Scheme aims to promote new ways of working in schools, providing the opportunity to develop an innovative and bespoke programme of learning designed to improve the quality of teaching and learning.

It’s about the school and the particular learning challenges that it is facing. A Lead Creative School will have access to creative people, skills and resources to support them and to address these challenges.

Osprey Studios won a placement in the excellent Pennard Primary School.

Three Cliffs Bay, Southgate, Gower

Three Cliffs Bay, Southgate, Gower.

The planning meeting was the best I’ve ever been to: very positive, practical and down to earth. Our Area Lead Artist, Photographer Lee Aspland, Headmistress Ms Hanson and her lovely, thoughtful teachers were flexible, supportive, very kind and clearly up for something exciting and challenging. They set the bar high and their dedication is inspiring.

  • Rebecca Buck Osprey Studios.Writer Daniel Archibald Buck  has collaborated with Osprey Studios for years. Here he describes his 5 days of intense, immersive, and hugely enjoyable workshops:’On Thursday 2nd February year five set out on what many would consider a herculean task: To write and perform an epic tale, with no preparation or script, in just five days.

    To put that in context, a two hour film can spend up to five years in production, and will likely focus on just a few characters at a time. This story would be much longer, and have as many as thirty three characters throughout – one for each member of the class.Rebecca Buck Osprey Studios

    On day one, the focus was clear, we were never going to all be on the same page unless we had a framework we could all share. So after some practice in the hall standing up and getting our brains in gear, we sat down to learn The Story Circle, based on Joseph Campbell’s text The Hero with a Thousand Faces.

    This is a stripped-down version of a degree-level screenwriting technique.

  • Spoiler alert, that circle contains all the work we noted down at the end of the project.Rebecca Buck, Osprey Studios

    Over the course of a day, we went from writing simple three line stories with just a beginning, middle and an end, toward struggles about heroes overcoming odds and clashing with difficult challenges.

    On day two, it was time to decide who our heroes were, and why. We started to develop ideas about Character development in depth, both in performance and in writing. Creating a character on the fly on stage in front of a group is a very different challenge to writing out facts about a made up person on a piece of paper. The kids were challenged with portraying a character’s job and emotion with acting alone in front of the class, and then with putting those characters together into scenes in which invented problems forced them to question how a certain person may react in a strange situation.Rebecca Buck Osprey Studios

    I don’t know if you’ve ever stood up in front of a group of your peers and pretended to be in a crashing airplane with no script, but it can be daunting, not least because something funny is bound to happen, and it can be hard to delineate between those laughing with you, and those laughing at you. The enthusiasm on display was impressive.Rebecca Buck Osprey Studios

    From there, we sat down to create a character in depth. Each person got to invent their own person, with fears, and hopes and dreams and special powers if they wanted. these characters would go on to become the focus of our story in the next few days, so they had to rich and vibrant, and stand up to scrutiny. Here are a few (pulled at random):

    Charlie, a Twelve Year-Old Orangutan from Vine Village, who wants to the King of the Jungle, but who is afraid of Tigers.

    Flames Boy, a Thirty Year-old Businessman. He lives in an ordinary house and drives an ordinary Lamborghini. He’s a super hero in his spare time.

    Dr. Pepper, who is from California and is afraid of children. His Nemesis is Pickled Onion (who is a Pickled Onion).

    Next we set about making masks, to represent these characters, so it would be easier to tell when we were acting and when we weren’t. Of course, it can be hard to create a mask that accurately depicts a sentient pepper pot, so in most cases it was decided to settle on a colour or a theme for your character, and to make the mask represent that.These were then left to dry over the weekend.

    Rebecca Buck, Osprey StudiosRebecca Buck Osprey StudiosRebecca Buck Osprey StudiosRebecca Buck Osprey StudiosRebecca Buck Osprey StudiosRebecca Buck Osprey Studios

When we got in on Monday morning, it was time to get down to business. We had three days left to create a satisfying narrative, to explore each of the characters we had made, and to make sure that everything was recorded and that all the ideas and themes we stumbled over on our journey were explored and understood.

After a warm up and some improv exercises in the hall, we ventured out into the grounds despite the cold and the wet, to stake a claim on this land for the characters who now lived there. It didn’t take long for our introductions to take a turn, and within the hour, spurred on by a vocal contingent of the group who advocated character-on-character violence, we had a succession of people standing up and delivering impassioned stump-speeches on the moral balance between violence and peace, good and evil.img_2320

But when there were no more words to utter, it became clear that there was only one recourse left by which this dispute may be settled. Those who advocated aggression saw that their counterparts for peace would not engage them on their terms unless a show of force was demonstrated. War was declared.Rebecca Buck, Osprey Studios

And so began the main chapter of our tale, which is now being chronicled and will be set into writing and told for seasons to come you can be sure. There was war, a bloody dictatorship, a desperate rebellion, economic prosperity in bleak times, devious subterfuge, assassination and resigned democracy. And in the end who can say whose side the historians will take?

Well, we can!

As the artists and historians of our own tale, it is now to the class to decide how the epic struggle will be remembered. Working with monument ceramicist Rebecca Buck, they are undertaking the construction of a great totem, to be erected as close as is practical, to the place where their characters first awoke.Rebecca Buck, Osprey Studios

It will take the form of an eternal throne, upon which you can depend many kings and orators and dictators and prophets will take their place, for it will stand for many centuries (indeed, it will likely outlive the school so long as it is not purposefully destroyed) and will we hope, not only affirm to generations as yet unborn that this school was lived in and played in before their time, but also that their struggles, their games, their questions are themselves eternal ones.

What is heroic? How can we be strong? What determines the right to lead? How do we shape our own lives, when there are always those who will try and shape them for us?

I, having had a chance to get to know them and work alongside them, am immensely proud of year five. They rose to the occasion admirably, and proved themselves capable of tackling ideas and problems above their regular curriculum. They created challenging and evocative ideas that broke the regular mold that is so often written off as ‘just kids stuff’.

If you as a parent want to get involved in the last stages of the project (particularly the Sculpture Installation), please get in touch with the school, and stay tuned for information on our grand unveiling over the next few months, where we will show off the monument to the world and were there will be a dramatic retelling of the tale we wrote.’

This Guest Blog for Pennard Primary School’s website was written by Daniel A. Buck, Lead Creative Schools Practitioner and Freelance Writer and Actor.


I sat in on these fantastic days to collect information for the sculpture and souvenir book for the school’s library. Occasionally a pupil would sit and draw with me if they needed a some perspective on the workshops but the vast majority of the time they were having far too much fun. They did give me lots of valuable feed-back on the ideas. It was wonderful to witness how deeply involved all the pupils were with the story they were creating. Miss Bygate, the very sensitive, gentle and inspiring form teacher, was there for her children giving encouragement and direction.

This process was, without doubt the best, most efficient and most productive form of ‘consultation’  I have ever had with a group.

Rebecca Buck Osprey Studios

We spent a lovely afternoon getting know the clay, Scarva ES50 Crank, and each other’s strengths in describing ideas with it.


Rebecca Buck Osprey Studios Rebecca Buck Osprey Studios Rebecca Buck Osprey Studios Rebecca Buck Osprey Studios Rebecca Buck Osprey Studios Rebecca Buck Osprey Studios Rebecca Buck Osprey Studios Rebecca Buck Osprey Studios Rebecca Buck Osprey Studios Rebecca Buck Osprey Studios Rebecca Buck Osprey Studios Rebecca Buck Osprey Studios Rebecca Buck Osprey Studios Rebecca Buck Osprey Studios Rebecca Buck Osprey Studios Rebecca Buck Osprey Studios Rebecca Buck Osprey Studios Rebecca Buck Osprey StudiosRebecca Buck Osprey Studios Rebecca Buck Osprey Studios Rebecca Buck Osprey Studios Rebecca Buck Osprey Studios All this work was photographed and recycled.

We had a well earned 4 day break which I used to make the scale model. I had a lot of great material. At the very outset we had agreed that the pupil’s ideas were to be at the centre of everything. Discussions with the kids during breaks developed the perfect vehicle for memorialising their story and sharing it with everyone else in play-ground: a magnificent throne incorporating scenes from the story in relief. There would be tunnels in a dynamic shape that will inspire creative narrative play. Pennard’s dramatic history and landscape would be featured to high-light the story’s context and link the future play there.

The top half of the sculpture would be ceramic and the lower half the same golden cement over blocks I used on the Marking Time sculpture in Bronllys Hospital grounds. The colour and texture match is really good. Some of the ceramic panels and tiles will be set into the cement as well.

Ms Hanson joined me and the pupils to walk the wonderfully large play ground that has a choice of landscaped areas that lead imaginative play. It is small wonder that these children are so bright, forth coming, creative and ingenious: Every member of the staff are committed and dedicated to empowering all of their pupils and enriching their potential. The school has a fabulous team of Volunteers that help them get maximum value from their very tight budgets. It was an honour to be part of it frankly.

We talked health and safety, budgets, prior and future uses of each area, took some measurements and chose the perfect spot in the centre of a circle of young but well established deciduous trees near a big mound with a tunnel and castle fortifications. A wooden play structure on the spot needed removing so we could accommodate that in our budget. I love to see money working hard.

The next Monday everyone accepted the scale-model and we went ahead to make the relief panels that would be set into the sculpture. This a fab, very cost effective method for getting the hands-on art-work of people onto a large form.

Rebecca Buck Osprey Studios Rebecca Buck Osprey Studios

The pupils worked incredibly hard for 2 solid days. Their panels are wonderfully varied and beautifully made. They helped and supported each other and me. And we had a lot of fun. Once their panel was completed a team formed to make a small name tile for each person involved in the project. Another team made round mini-tiles with a stem to anchor it securely into cement. These will set off the panels nicely across the form. Miss Bygate was a star and kept everyone going and even helped load up the van. She is amazing. I drove home on cloud nine. Excellent art-work, a perfect sculpture site, a budget that would be thoroughly squeezed dry and a scale model I knew was right because the consultation was so immersive and genuine.

Rebecca Buck Osprey Studios Rebecca Buck Osprey Studios Rebecca Buck Osprey Studios Rebecca Buck Osprey StudiosDaniel had run a Workshop for parents and pupils so that they could get a feel of what their children were working on. I did one for them in using clay for learning and play. I was very pleased and not surprised to find that these parents were already well into doing stuff like that at home. Miss Bygate set out a lovely display of really good photos that she had taken all through the workshops. Then she gave them to us for the Book. Similarly my short workshop for the staff mostly confirmed what they were all ready doing. The post How to use clay in Primary Schools affordably will be useful.

I’m on day two of the build at Osprey Studios.Rebecca Buck Osprey Studios

Rebecca Buck Osprey Studios

The Pennard scale model in front of the build in progress of the upper, ceramic section, of the sculpture.

This is the first half of the framework. The final piece will be 130cm high, 2 metres wide and 1 metre deep. Once the framework is complete, with the section cuts and firings planned, I can add on the pupil’s and my own art-work. This will develop the thickness and strength of the walls. The clay is Scarva ES50 Crank, the same clay the pupils used. It will be fired to 1260 degrees C and turn a soft golden yellow that matches the white cement/golden kiln dried sand that will be used for the lower section and all joins.

Rebecca Buck Osprey Studios


Studio Diary: The Marking Time Sculpture at Bronllys Hospital, Powys.part 5.

Marking Time Sculpture for Bronllys Hospital, Powys, UK.

Marking Time Sculpture for Bronllys Hospital, Powys, UK.

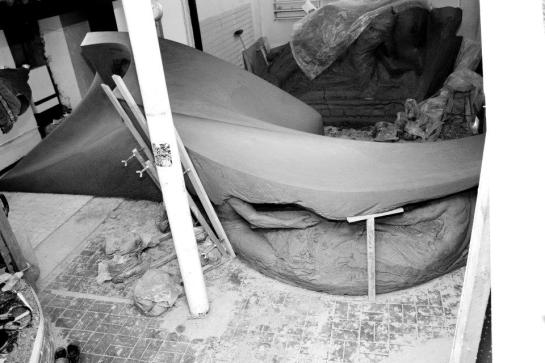
The full structure is built and the 1st layer of the textured surface is on. It has been every bit as challenging as I hoped!

Marking Time Sculpture for Bronllys Hospital, Powys, UK.

Marking Time Sculpture for Bronllys Hospital, Powys, UK.

The next stage is developing  the surface to enhance the flow of the curves. The clay with extra grog added will go on in layers using ever-smaller tools. It takes a great deal of time but it will leave fascinating, subtle surfaces and edges that are also very strong.

Marking Time Sculpture for Bronllys Hospital, Powys, UK.

Marking Time Sculpture for Bronllys Hospital, Powys, UK.

In these early stages it can look distractingly chaotic. Any part that just doesn’t work well can be removed and redone.

Mick Farrell and Janet Epplestone visiting Osprey Studios to help with their very useful feed-back.

Mick Farrell and Janet Epplestone visiting Osprey Studios to help with their very useful feed-back.

It was lovely to have Mick and Janet call in to give me their objective feed-back. And some gorgeous flowers for my birthday! I will get in as many people as I can to double-check how the piece is being read. The Red Kite is becoming very clear. Bringing together the Dragon will be the trickiest bit.

Marking Time Sculpture for Bronllys Hospital, Powys, UK.

Marking Time Sculpture for Bronllys Hospital, Powys, UK.

Studio Diary: The Marking Time Sculpture at Bronllys Hospital, Powys.part 4.

Working on a large scale means returning to the same form everyday for months. So you need to be sure about the design.

I’m really pleased with the scale of the Marking Time Sculpture. It is within the human scale range so that the embrace and  eye level of the dragon and the kite/guardian’s wings will feel very personal.

Marking Time scale model.

Marking Time scale model.

Osprey Studios has a flexible layout and a solid floor so that anything up to 6m x 3m can be built there which keeps costs down.

Osprey Studios has a flexible layout and a solid floor so that anything up to 6m x 3m can be built there which keeps costs down.

The base foot print was painted on the floor in red and the outline of widest/deepest edges painted in blue to check that there will be space to work around the forms. The largest section is set on blocks to give the height of the eye-line. The other 2 sections are on wheels for easier access. The base footprint is painted on the boards in blue.

I always miss my wonderful Volunteers from past projects at this point. But it is a lot easier to be building in my own studio. Advancing decrepitude means some of my systems for moving heavy loads around lack dignity. And I can loose myself in the curves.

Areas are kept wrapped in plastic to keep the drying even. When you add new clay you need to allow time for the water to re-balance itself down the form. A large piece will be holding gallons of water.

Areas are kept wrapped in plastic to keep the drying even. When you add new clay you need to allow time for the water to re-balance itself down the form. A large piece will be holding gallons of water.

I am building the armature of the piece. The final surface will be added to it so I need to keep the clay at the best stage of hardness. Scarva ES50 Crank holds its water really well while still being very strong at the leather-hard stage.

I will be adding a lot of deep texture and modelling so these armature walls are very thin. In places the lines and curves of the final form are showing.

There is an internal support structure made of clay that will stay in place during the firing. It will help to support the sections when the sculpture is cut up so you need to plan them well in advance. Other materials like foam and wood are used inside just long enough for the clay to stiffen. External supports can be anything. They will need constant adjusting to accommodate shrinkage. I have a treasured collection of heavy-duty props and oddly shaped bits of wood.

There is an internal support structure made of clay that will stay in place during the firing. It will help to support the sections when the sculpture is cut up so you need to plan them well in advance. Other materials like foam and wood are used inside just long enough for the clay to stiffen. External supports can be anything. They will need constant adjusting to accommodate shrinkage. I have a treasured collection of heavy-duty props and oddly shaped bits of wood and memory foam.

The lines of the supports can be distracting.

The lines of the supports can be distracting.

2/3 of the way up. But the forms are not complete, especially width-wise. You see the movement starting in the curves of the central space. I'm using the sound-track from The Legend of Korra to keep the theme consistent across the weeks of work.

2/3 of the way up. But the forms are not complete, especially width-wise. You see the movement starting in the curves of the central space. I’m using the sound-track from The Legend of Korra to keep the theme consistent across the weeks of work.

Studio Diary: The Marking Time Sculpture at Bronllys Hospital, Powys.part 2.

Marking Time Scale Model 1

Marking Time Scale Model 1

It has been a really good Consultation period. Everyone has been very open and generous with their time and thoughts, even when it was very difficult for them to do so.

The models, figures, benches and bases shown are all to scale. The full sized versions would have more texture/detail and the benches would be a metre further away.

We identified our primary audience as the people using, visiting or working at Bronllys Hospital. The overall impression/feel of the sculpture should be up-lifting and hopeful to support those who are ‘marking time’ in  stressful circumstances.

“The sculpture should have an aura of peace that will not interfere with the person’s unique moment”

“…so people can sit down and stay calm and feel safe.”

” In the discipline of Marking Time and manoeuvres like that, vulnerable people can find structure for their chaotic lives.”

” Marking Time is marching on the spot, keeping the beat, keeping in step with the group, in readiness to move onto the next task.”

And this triangle is the spot where the Marking Time Sculpture will go. There will be comfortable benches set in place so visitors, patients and staff have a tranquil place to sit and get a break from the often over-whelming activity in the Hospital.

And this triangle is the spot where the Marking Time Sculpture will go. There will be comfortable benches set in place so visitors, patients and staff have a tranquil place to sit and get a break from the often over-whelming activity in the Hospital.

The children at Mount Street Junior School felt it was important to help the Servicemen and women to forget and to ease them back into civilian life with games, walks, sports and domestic routines. The Ex- Servicemen and women agreed that humour and a sense of playfulness were key in allowing them not to forget but to learn to feel again. Military training is, by necessity, dehumanising:

“Dehumanised Soldiers find it hard to play nicely…”

“Snowball fighting can be more fun than real fighting because nobody gets hurt.”

The children agreed that ” The Soldiers need a bridge for when they come back to their families from the War.”

Many Servicemen are adolescents when they join-up and  their training replaces the natural pace of growing up. They cannot contextualise the shocks they are exposed to.

Marking Time Scale Model 1

Marking Time Scale Model 1. Bird forms in many sizes creating movement around the central space. 160cm H.(incls base).

Marking Time Scale Model 2

Marking Time Scale Model 2. Bird forms with a patterned texture suggested. 1metre high from the ground.

So: a sculpture with a narrative that releases the imagination, shows protectiveness and how the burden of being fierce and brave is shared and eased by those, of all sizes, being protected.

Marking Time Scale Model 3

Marking Time Scale Model 3. Three bird-forms.180cm H (incls base).

“A flowing circle, the movement of life, love, hope and promise will draw you in and guide you to change.”

Marking Time Scale Model 3

Marking Time Scale Model 3

Marking Time Scale Model 3

Marking Time Scale Model 3

“Regrets, we all have them. You need Hope to manage them.”

“Ephemeral, shadow-like.” ” A dragon in the mist.” “Inter-weaving the real and the etherial, making them equal.” ” Dragon of protection, Bird of hope.” “Intertwined spirals” “Water represents calm and peace. Flowers represent beauty. Dragon represents protection.” “…and a mystical Dragon and a moat with 3 piranhas.”

Marking Time Scale Model 4

Marking Time Scale Model 4

                                                  “The Bronllys Dragon by Ben,aged 8.

             Once upon a time there was a Dragon called Yddraig Goch. He would guard the Castle day to night until one day the Gorgan Maduser came. She looked the dragon in his eye but Yddraig Goch was quick as lightening to fly away. Yddraig Goch flew to the Military and perched on the roof. The army heard a thump on the roof and found Yddraig Goch, the Welsh Dragon.

                                               “Shoot him” said Ian. “I am ready, Sir”

                                                         “Wait!”said the Captain.

                                                         “What?!” said the army.

                                               “It’s Yddraig Goch, Lets make friends.”

              “What, with a Dragon?”  “Yes! Maybe he can help us against the other armies.”

Marking Time Scale Model 4

Marking Time Scale Model 4


The triangle base and the use of 3s has multiple significances in the Military, where groups are divided into 3 parts throughout it’s structure starting with Army/Airforce/Navy. Celtic and Christian symbolism is over-flowing with 3s.

Linked to the triangle is the heart shape, despite its over-use, still a “powerful symbol of the strongest emotion, the one that triumphs over all others.”


Marking Time Scale Model 4

Marking Time Scale Model 4

In Wales the Dragon is an especially potent icon representing the Land and bravery. The Red Kite is the Welsh National Bird and the symbol of Powys. Red Kites live separately but hunt and feed collectively when ever they can. They have an ordered community and share food and protect each other. After nearly going extinct in the UK due to cruelty and stupidity, their recovery has been brought about by the protection from a better society. Breeding from the surviving Welsh Kites, their numbers are growing: like the phoenix rising from the ashes.

For each version of the Sculpture: The Mosaic Base.

            The base of the sculpture will raise slightly in the centre of the triangle. A mosaic of good sized tiles of many shapes, with images and words about what makes up a strong Community, made with Mount Street Juniors and the A-Level students in Llandrindod Wells and beautiful, and vivid glass pebbles will be set in swirling lines with the most colour in the centre representing souls, ideals, that which is vulnerable and precious. 

The colours are blues/greens/yellows.

In the corners of the triangle will be set large tiles with ‘Accept the Past’, ‘Trust the Present’ and Faith in the Future’ and celtic knot-work carved on them.

 Assessment:

I don’t recommend Models 1-3. They are lovely in themselves but don’t quite hit the mark. They have been useful transitionary pieces.

Model 4:

The dragon’s expression will be extremely gentle and caring. The birds, of all sizes and types but mostly red kites will soar out from the centre. They will have a softness to their lines. They will support, encourage and assist the benevolent dragon, their wings working with his.

The max height (including base) is 180cm. Width: 150cm. Depth: 180cm.

The form has lightness and movement but is actually very strong and safe in all the ways discussed.

There will be many view-points of the mosaic.

The full sized version will have expressive textures and many more birds than could be put on a small model. It will be a very complex build and I am happy to add voluntary hours to the budget and time-line in order to complete this challenging piece because I believe it will be very beautiful.

Model 4 uses the consultation resources and our intended outcomes to the best effect. I feel everyone who contributed will be very pleased and will be able to see that their work is included.


Model 5: This is a condensed version of Model 4. It has the best of Model 4 and it adds the iconic local sky-line of Pen y fan mountain in the near-by Brecon Beacons. The Kite is now powerful enough to bring a sense of guardian angel to the mix. The Dragon and the Kite interact to create an embrace around the centre of a richly coloured mosaic of glass pebbles and hand-made and decorated tiles in shades of blue and green that swirl outwards from the centre. It has 3 points connecting it to the ground. There are 2 holes through the form.

Marking Time, Bronllys Hospital, Scale Model 5.

Marking Time, Bronllys Hospital, Scale Model 5.

Marking Time, Bronllys Hospital, Scale Model 5.

Marking Time, Bronllys Hospital, Scale Model 5.

Marking Time, Bronllys Hospital, Scale Model 5.

Marking Time, Bronllys Hospital, Scale Model 5.


The max height (including base) is 180cm. Width: 150cm. Depth: 180cm.

The form will not get cluttered with leaves in the way that Model 4 will in this woodland site. Model 5 will age gracefully with out looking neglected. It is sturdy and safe while retaining the flowing movement.

Update, 5/3/16

To keep within the Budget we need to reduce the size of the foundation.

Model 6 is based very much on Model 5 but it is divided into 3 sections which has lead to some interesting and lovely developments in the forms. The sense of the protective, sheltering embrace is still clear but there is more movement and echoes of bird-forms. The dragon’s head is moved into the centre adding to the protective feel and this enhances the over-all silhouette.

The dimensions are the same. I have added to the base-line so that the 3 forms are self-supporting to ease strain on the small foundations.  When the sculpture was a single form it supported itself from tipping over. But the weight was all standing on 3 small points that would have put a lot of strain on a small foundation. The 3 sections allow some ‘give’ as the sculpture settles on the site.

This model is not as neatly finished as Model 5: don’t let that distract you. I will use both models during the build.

Marking Time Model 6.

Marking Time Model 6.


Marking Time Model 6.

Marking Time Model 6.

Marking Time Model 6.

Marking Time Model 6.

Marking Time Model 6.

Marking Time Model 6.

Marking Time Model 6.

Marking Time Model 6.

The foundation will have 3 parts linked by a reinforcement-bar grid. Hard-core will form a small rise towards the centre. The mosaic will be set into hand-made cement paving slabs made at Osprey Studios. This will give more time to the layout of the mosaic and the results will be better than setting them onsite. It will save the surprisingly large cost of Out-door Tile Adhesive.

This is a good set of solutions with a lot gained and nothing lost except the costs of a large, poured foundation. It does create a lot more work for the sculpture-build but I am willing to take that on: it will be satisfyingly challenging.

How to Coil-build with clay from small to monumental.

There are lots of variations on the Coil-Building method. This one avoids all the pit-falls that cause your pots to go out of shape or break in the kiln.

I started out as a Coil-builder 34 years ago and I still turn to it regularly. All my monumental brick sculptures are coil-built. It’s all about understanding the clay and how joins are actually formed. The skills you gain from coil-building are extremely transferable making it a great place to start for beginners. There is a lovely rhythm to the work.

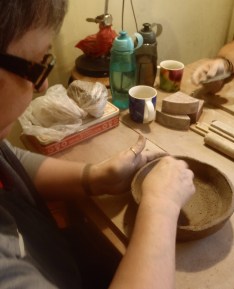
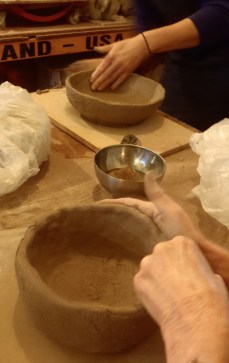
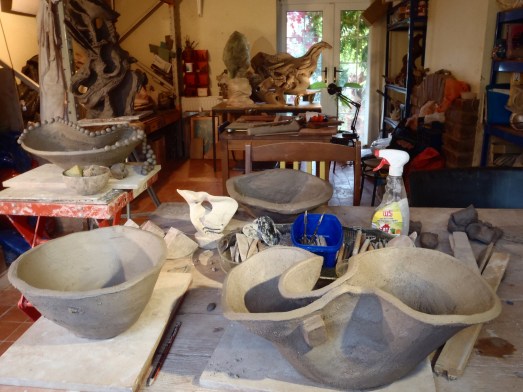
Here is the Coil-building Workshop that I run at Osprey Studios. Many thanks to my lovely students for being in these pictures.

How to do excellent Coil-Building.

Rebecca Buck, Osprey Studios.

Choose a clay with a medium to high percentage of multi-grade grog ( grit in different sizes from dust to medium sized bits). Scarva ES 50 Crank is ideal. Clays of this type will give you the best results.

Start with the biggest pinch-pot you can comfortably make. (Unless your piece is really too big.

1.Start with the biggest pinch-pot you can comfortably make. (Unless your piece is really too big; leave out as much of the centre of the base as possible.)

Make it round.

2.Make it round.


The most important thing is an even thickness of up to 2cm at any point.

3.The most important thing is an even thickness of up to 2cm at any point.

Gently ease it into the shape of the first section of your pot.

4.Gently ease it into the shape of the first section of your pot.

Set it aside to stiffen up.

5.Set it aside to stiffen up.


Have several on the go at the same time so you are not tempted to rush each one.

6.Have several on the go at the same time so you are not tempted to rush each one.

Prepare the top edge to make a join.

7.Prepare the top edge to make a join. NEVER use a pointy tool. Use a serrated tool so that the score marks are not too deep. Fill these ‘ditches’ with water and give it time to soak in. Dab on a little more. Then put on slip; slip is perfect for holding a lot of water in place.

Very important bit.

Genuine joins are formed when the chains of platelet-shaped particles from each section inter-lock. Imagine a magnified image of tangled hair.

Score marks do not give the surface ‘tooth’; they allow water into the clay-body. On vertical surfaces score marks and slip hold the water in place to give it time to sink in.

Slip is not ‘glue’. It is clay particles spread out in water and has little strength, especially when it has dried. It is ideal for holding a lot of water in place to give it time to be absorbed to soften the area of leather-hard clay.

Never use a needle tool. Your score marks will be too narrow and deep. They will get covered over, resulting in a ring of tiny but malevolent air-bubbles that will expand in the firing and a crack will zing along the joins. I have fired pots for poor, misinformed makers that have come apart at every coil! You could see the deep score marks and powdery slip.

Start making your coil from a generous block of clay. Squeeze it gently and repeatedly into a thick sausage shape.

8.Start making your coil from a generous block of clay. Squeeze it gently and repeatedly into a thick sausage shape.

Using 2 hands gently squeeze your coil until it is 2 or 3 cm thick. Do NOT roll your coil.

9.Using 2 hands gently, and rotating, squeeze your coil until it is 2 or 3 cm thick. Do NOT roll your coil.


Every join is an opportunity for a crack, every coil a point where you might loose control of your shape. So it makes sense to use coils that are large enough to handle well and will give you 4cms of height.

Rolling your coil on the table can cause 2 problems;

  1. The grog that would have helped create an excellent join is packed towards the centre of the coil and the finer particles of clay are packed together to form a ‘skin’ of tight platelet shaped particles that are reluctant to reach out and bond with the platelets of the pot.
  2. enthusiastic rolling often causes a tunnel to form at each end of the coil that would be a substantial, damaging air-bubble. This is why you often see coil-builders break off both tips of their coils with out even looking at them; they know that hazard is probably there.
Rub the softened score-marks and excess slip off the pot until the edge is sticky not slippery. Your platelets are raised and receptive.

10.Rub the softened score-marks and excess slip off the pot until the edge is sticky not slippery. Your platelets are raised and receptive.

Attach 1 end of your coil. Hold the other end high. Gradually lower the coil, expelling air and any surplus slip.

11.Attach 1 end of your coil. Hold the other end high. Gradually lower the coil, expelling air and any surplus slip.

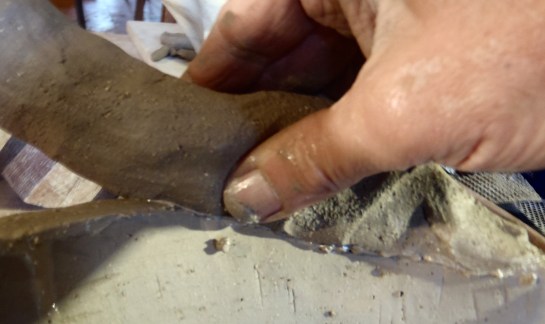
Guide the coil downwards and forwards with a pinch. This action creates a friction between the 2 surfaces that causes the platelets to hook onto each other from the pot to the coil.

12.Guide the coil downwards and forwards with a pinch. This action creates a friction between the 2 surfaces that causes the platelets to hook onto each other from the pot to the coil.

Do not be tempted to push clay down the pot with this step. Go to the end of your coil and stop. Do NOT go up another layer!

pinch upwards gently only at the seam off the join. (your finger and thumb will touch pot and coil each time) I call this lining-up.

13.pinch upwards gently only at the seam off the join. (your finger and thumb will touch pot and coil each time) I call this lining-up. Do inside first; this may push the wall out. next do outside; this will correct a bulge.

The over-hang of the coil can trap air if hastily pressed down. Rushed building is why coil-pots have a very unfair reputation for being hideous.

Go around and move clay down with your thumb; 1st the inside, then the outside as above.

14.Go around and move clay down with your thumb; 1st the inside, then the outside as above.

With thumbs inside and fingers on outside ( for best control) gently pinch the clay in the desired direction for your shape. Use many light pinches not a few strong ones for best results. The most important thing is the thickness. Not the height.

15.With thumbs inside and fingers on outside ( for best control) gently pinch the clay in the desired direction for your shape. Use many light pinches not a few strong ones for best results. The most important thing is the thickness. Not the height.

Support with 1 hand on outside. Gently move clay in many directions to get that coil right where you want it. Inside first, of course.

16.Support with 1 hand on outside. Gently move clay in many directions to get that coil right where you want it. Inside first, of course.

Now the outside.

17.Now the outside.

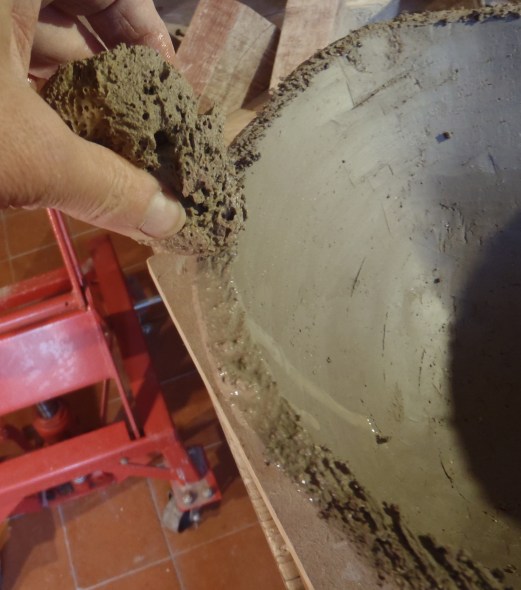
Support hand on outside, use serrated kidney to improve inner surface. Go in many directions, gently combing the clay into place. Then do the outside.

18.Support hand on outside, use serrated kidney to improve inner surface. Go in many directions, gently combing the clay into place. Then do the outside.

Repeat this action with a firm rubber kidney creating a strong, smooth surface.

19.Repeat this action with a firm rubber kidney creating a strong, smooth surface.

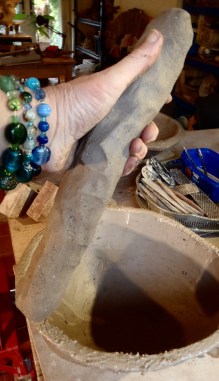
Sit back and look at the outline of your form. Use a paddle (flat stick) to tap in bumps or bulges. Rotate around the whole form in stages so that the stress of this action is spread evenly through the clay. Paddling compacts the clay particles making your form very strong. But over-doing it on one area can lead to cracks because it alters the drying rate.

20.Sit back and look at the outline of your form. Use a paddle (flat stick) to tap in bumps or bulges. Rotate around the whole form in stages so that the stress of this action is spread evenly through the clay. Paddling compacts the clay particles making your form very strong. But over-doing it on one area can lead to cracks because it alters the drying rate.

Paddling can clarify your shape: it's really satisfying.

21.Paddling can clarify your shape: it’s really satisfying.

Use curved tools to paddle the inside.

22.Use curved tools to paddle the inside.

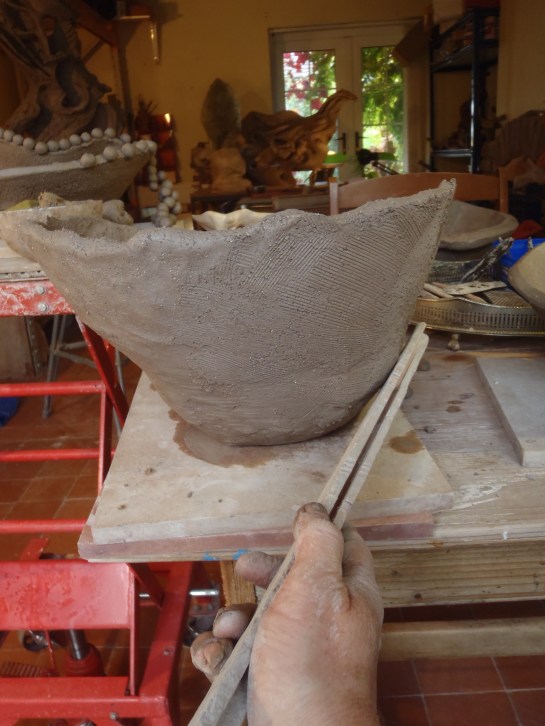
Soften any indented areas that you don't like and add clay to fill them. Add textures in the same way. Paddle them gently.

23.Soften any indented areas that you don’t like and add clay to fill them. Add textures in the same way. Paddle them gently.

Scrape /smooth with those kidneys again.

24.Scrape /smooth with those kidneys again.

Now even up the top edge by subtracting or adding clay. Let it stiffen. Go over it again with a surform blade.( these take off nice controllable layers.)

25.Now even up the top edge by subtracting or adding clay. Let it stiffen. Go over it again with a surform blade.( these take off nice controllable layers.)

Spend a lot of time on the edge. use firm tools to compact the clay and get every millimetre of that edge exactly how you want it: attention to this detail will transform your pot.

26.Spend a lot of time on the edge. use firm tools to compact the clay and get every millimetre of that edge exactly how you want it: attention to this detail will transform your pot. Also tidy up the bottom edge where your form meets the table.

Rebecca Buck, Osprey Studios.

27.My coil-building tools. The spray is water.

Coils are perfect for all sorts of applications.

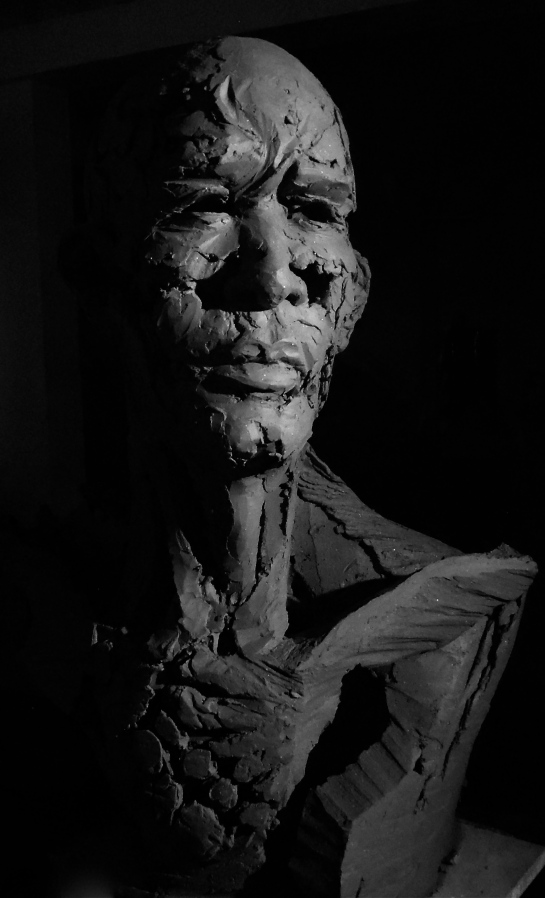
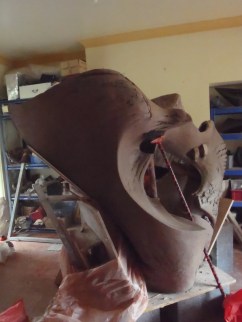
 This bio-morphic head is being built on a clay armature with the techniques described in How to Make a Head. I use coils attached in exactly the same way as I would on a pot to get excellent joins. The coil is then pinched in the direction I want it to go.

28.This bio-morphic head is being built on a clay armature with the techniques described in How to Make a Head. I use coils attached in exactly the same way as I would on a pot to get excellent joins. The coil is then pinched in the direction I want it to go.

Using Supports.

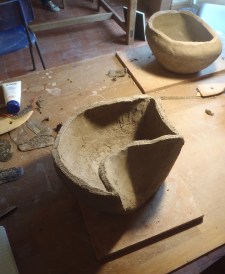
When you are making complicated shapes use temporary supports made of clay that will shrink with the form. Build in support walls and buttresses. Use rigid supports with care: plan to accommodate the shrinkage.

Here I am putting down the first layers of 2 big sculptures. I am using Coleford brick clay in a very soft state. My 'coils' are half bag blocks but they are applied and treated in the same way as any good coil. The walls are thicker at the base to support the considerable weight of the next layers. The internal support-walls are thinner. On very big sculptures these support walls will be discarded when the sculpture is cut into sections. On medium sized sculptures, that will be cut into parts not panels, the internal support walls will be left in to maintain the shapes during firing.

29.Here I am putting down the first layers of 2 big sculptures.
I am using Coleford brick clay in a very soft state. My ‘coils’ are half bag blocks but they are applied and treated in the same way as any good coil.
The walls are thicker at the base to support the considerable weight of the next layers.
The internal support-walls are thinner.
On very big sculptures these support walls will be discarded when the sculpture is cut into sections.
On medium sized sculptures, that will be cut into parts not panels, the internal support walls will be left in to maintain the shapes of the sections during firing.

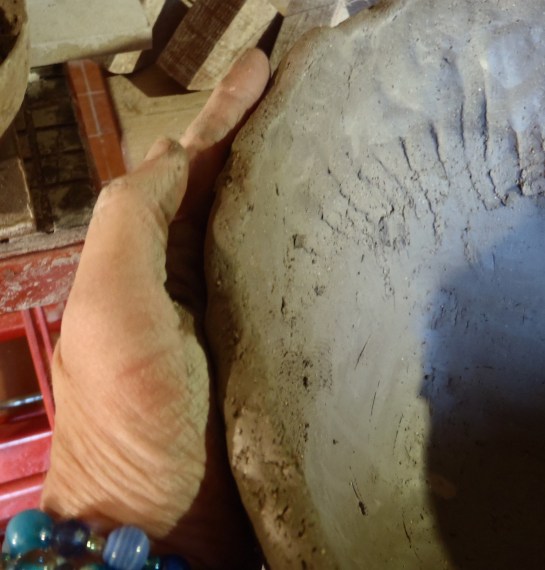
30.Note the finger marks left by the process: these are just like the marks of a serrated-kidney on a smaller pot. Like corrugation, they add strength to the wet clay wall and will be left on until the clay is firm enough to hold it’s shape.


The same layer of the fired panel-sections of the same sculpture during installation.

The same layer of the fired panel-sections of Bruce during installation.

Bruce in progress. There is a clay support wall under his head and the stack of blokes.

31.Bruce in progress, 3m wide x 2 m high. There is a clay support wall under his head and the stack of blocks was added later and removed as soon as the head was firm enough to cut apart.

Here’s some good examples of rigid supports in action:

Mynydd Mawr Courtyard Sculpture, Tumble, Carmarthen, Wales, 2m H x 190cm W.

32.  Mynydd Mawr Courtyard Sculpture, Tumble, Carmarthen, Wales, 2m H x 190cm W. The big blocks are firm memory foam which will accommodate the shrinkage. I often use it inside a piece to support ceilings. It gets removed when the piece is cut up.

Rebecca Buck, Osprey Studios.

33.Because this rigid support leans outwards it will not constrict the shrinkage. It was adjusted repeatedly during the build.

Mynydd Mawr, Tumble, nearly complete. Larger sculptures are always built from a scale model. The internal support walls are worked out in advance and the cutting of sections planned so that those walls will support the section's shape during firing.

34.Mynydd Mawr, Tumble, nearly complete. Larger sculptures are always built from a scale model. The internal support walls are worked out in advance and the cutting of sections planned so that those walls will support the section’s shape during firing.

front view. That broom was a good buy.

front view. That broom was a good buy.

Balarat Pit Marker,in progress, 6m L x 2m H.

35.Balarat Pit Marker,in progress, 6m L x 2m H. ( Ocean Colliery Pit Marker in background.) Memory foam on top of clay support walls inside the sculpture supports that long roof and accommodates the shrinkage.

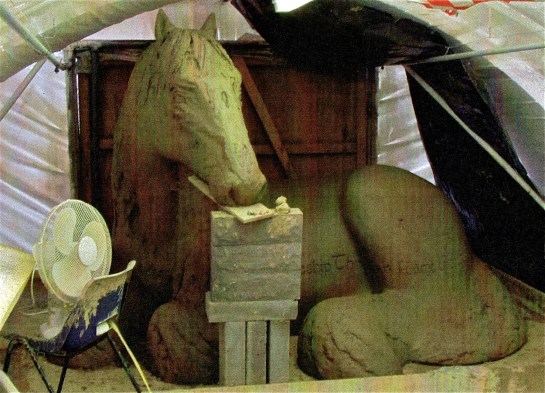
The Sirhowy Wyvern in progress, 3m L x 2 m H. A tunnel runs under the horse with carved images on it's walls so we needed access to it. A thin support wall blocks the tunnel half way. It supports the structure but allows us to crawl in do the art-work ( a lot was done by some fab children) The support was discarded when we cut the sections. We didn't get to see the tunnel right through until it was installed on site.

36.The Sirhowy Wyvern in progress, 3m L x 2 m H. A tunnel runs under the horse with carved images on it’s walls so we needed access to it. A thin support wall blocks the tunnel half way. It supports the structure but allows us to crawl in do the art-work ( a lot was done by some fab children) The support was discarded when we cut the sections. We didn’t get to see the tunnel right through until it was installed on site.

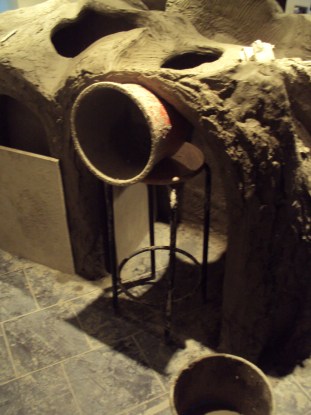
Bucket and stool supporting the tunnel roof while we built it. The board to the left of the picture is there to protect some intricate carving about the Sirhowy Iron Works during the build.

37.Bucket and stool supporting the tunnel roof while we built it. The board to the left of the picture is there to protect some intricate carving about the Sirhowy Iron Works during the build.

Adding clay on to the surface.

38.All the big coiled sculptures have artwork added onto the surface once it is firm. Exactly like the smaller pot, the area is softened using scored ‘ditches’ and slip to hold the water in place, allowing it to soak in to the firm clay and raise up those platelet shaped clay particles ready to join with soft clay.

Once a good join is achieved the added clay is modelled and carved in stages as the clay firms up. The drying ( and shrinking) is kept slow using plastic covers to allow that vulnerable join to set as the water moves from the soft added clay into the firm wall.

Remember that water will always want to be level and will travel down the form over time as well as evaporating from the surface. This passage of water past those platelets completes the join. If there is too much water it will collect and run down  the join, destroying the bond.

With that in mind add as much clay as your artwork needs. If it becomes more that 2 cm thick hollow it from the inside even if this means cutting the section out of the form, hollowing it and reassembling it. The important thing is to find a way to get the look you want. For advice on this process click here: Working solid and hollowing sections out.

Drying coil-built forms.

39.Use plastic to shield firm parts from drying while you work on new parts. e.g. a strip of plastic sheet to keep the top edge soft while you put art-work on a lower area before it gets to hard. And visa-versa.

Slow the drying as much as possible to allow all those joins to set using plastic sheets.

Cover the piece in a shield of newspaper ( 5 sheets thick) or a cardboard box or fabric sheets (not wet) to create a  damp micro-climate that will slowly release the water from the clay and protect from drafts that would cause un-even drying (and maybe, consequently, cracking)


Related info on this site.

For a full description of how the really big sculptures are done click here: Building Brick Sculptures on a monumental scale.

The whole story of the fab Gwalia Mynydd Mawr Care and Nursing Home Courtyard Sculpture designed with local primary school children and staff and residents of the Home, run by Arts Care Gofal Celf in Carmarthen, Wales: Studio Diary, The Tumble Commission, parts 1-8. 

Using clay armatures and coils: How to Make a Head: Clay Armatures and Building Hollow.

Questions?

put your questions in the Comments below and I will do my best to answer them.

If you follow this site you will get an e-mail each time I put up a new post. I hope these ‘How to..’ posts are useful. Pass them on freely. Share pictures of what you make  on my Facebook. I would love to see it.