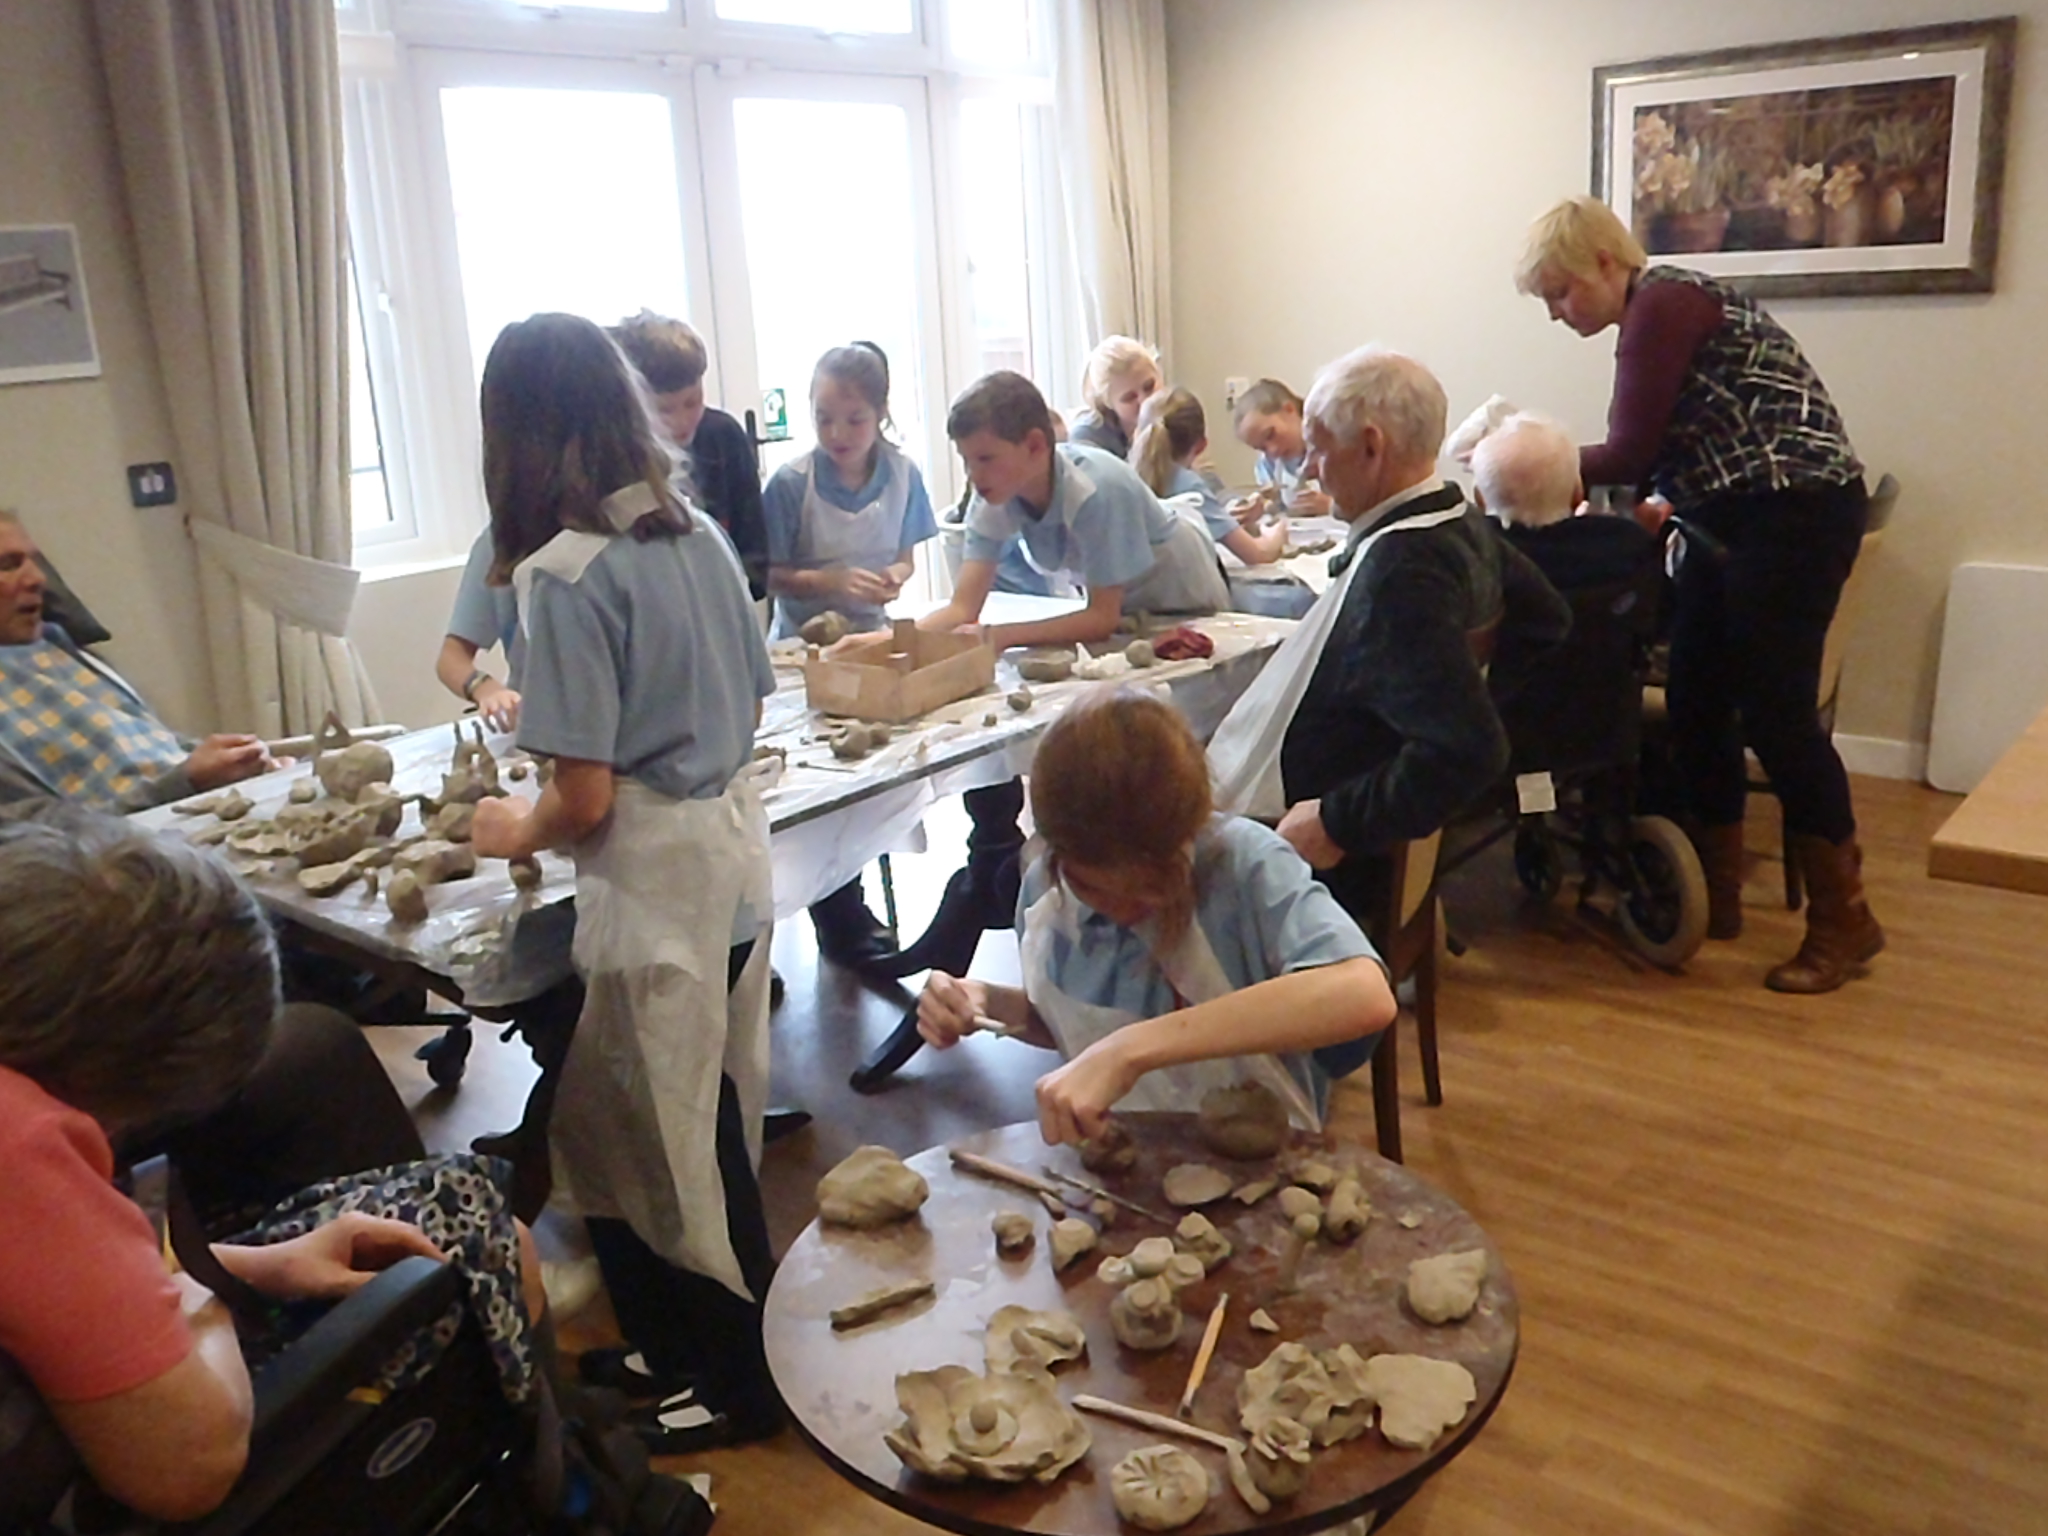
Primary School Pupils making models about memories in Carmarthenshire.
Clay is a fantastic resource for schools. Kids relate to it immediately and it usually engages their attention for surprisingly long periods. The majority of Pupils will learn best when their hands are busy. It is the 3D equivalent of Drawing; it’s not just for arts and crafts; it’s versatility and affordability means it can be used to enhance all sorts of subjects even maths or history. Many children will find expressing and accessing their ideas in 3D much more natural than using 2D and for some it will be much easier than using words.
Making a Zoo complete with 4 toilets, a car park and an over-looking military complex. We worked on this all day, took photos and then squashed it all up. Fantastic fun, lots of skill sharing and teamwork.
Bringing an experienced Ceramic Artist into school is a great idea and will be worth every penny for special projects. But for everyday use the most important skill needed is the one you have; knowing your kids and understanding how they learn best. The clay-skills required are very straight forward.
Plan to recycle the clay at the end of each session just like a superior version of Plasticine.
Apart from special Projects there is no good reason to fire clay-work in Primary School. Firing adds complications to the skills required, storage problems, big costs and lots of extra work for teachers.
If you want your Pupils to benefit from the science and art of firing ceramics bring in a Raku Potter for a day. It will be fantastic fun, massively educational and the ceramics will be gorgeous!
You don’t need all these things to start off. Quality hand-building clay is the most important thing. There are countless different clays designed for different tasks. The wrong clay can make people feel like failures.
CLAY
Until it is fired Clay can easily be recycled endlessly until the end of time.
Bath Potters Supplies are the most helpful, kind supplier I’ve come across and they will give you great advice. Just tell them you want a white (non-staining, easy to clean up) medium grogged (grog gives the clay much better handling qualities and the greater dry strength needed for self-hardening use.) hand-building clay.
Delivery will be about £10 for up to 25kg.
All the ‘Self-hardening’ clays I have ever tried are unpleasant and difficult to use, very expensive and not significantly stronger when dry than a lovely quality hand-building clay.
TOOLS
Tools make all the difference to what you are able to make. Using them develops fine motor and eye-to-hand skills
Wooden Modelling Tools and Ribbon Tools will be the most popular. Ebay always has affordable letter stamps that will be very useful and sometimes good tools.
-Re-usable plastic table-cloth cover if you are worried about scratches on your tables as this clay has small grit in it.
-a few micro-cloths. They are the quickest, easiest cloths for cleaning tables and hands.
-Boards are optional. B&Q will custom-cut a sheet of MDF for you. A board wide enough to fit across a wheel chair is great for some people.
Approx cost, incl. sheet MDF; £60. You don’t need all these items to start off.
Big Join-In Sculptures have a job for everyone and even the smallest contribution is part of something fantastic.
The quality clay is the important item. Clays are made with recipes and therefor there is an infinite number of types of clay, each with particular properties. ES70 is absolutely lovely to use; it feels very nice, it’s not sticky, it doesn’t stain, it’s easy to clean up (on carpet let it dry + brush out), it’s not irritating to sensitive skin and you can eat it! Most importantly it is very easy to use so people get good, rewarding results quickly. Beginners deserve a great material that will reward their bravery for trying something new and give them fab results that will spur them on.
ES70 works very well as a self hardening clay and can be decorated with poster paints once it’s dry.
Plan to recycle all the clay, even if it’s painted or has dried completely. Explain that the clay is expensive so you need to keep it for next time so that they don’t think it’s because you assume they will make rubbish! Pupils are usually perfectly happy to let it go. Often it takes the pressure off to make a ‘product’ and they can relax and enjoy the making part more.
Clayton The Rottweiler has a full set of internal organs including a working bladder! At the end of the session we recycled the clay.
Re-using the Clay
-At the end of a session drop all the clay back in the bag. (lots of pupils will love smashing the work up!)
-Put bag in Bucket
-slowly pour a cup or so of water over the clay in the bag to soften the clay.
-Close bag w/ twisty
-leave over night or longer.
-place bag on floor and step on it a few times to “knead” the clay, turning bag a few times.
-Voila! It is ready for use. You can re-cycle your clay endlessly.
!? Bag goes rock-hard; Allow to dry completely, drop lump on floor to break up, put pieces in bag and recycle
!? Bag goes quite hard; knock holes all over lump. (hammer + screw driver= surprisingly satisfying task!) Return to bag and add water.
!? Bag goes too squishy; Tip clay onto a board and allow to dry until usable. “Knead” a few times over the day (or two) so that it dries evenly.
For larger quantities of clay recycling click here.
Storage
-Always close bag tightly w/ twisty
-Ideally store in a handy frost free place but it doesn’t matter if the clay freezes.
-Ideally have the bucket on wheels as 12.5kg is quite heavy (plant pot wheels – Home-Bargains, £1.99.)
-Have all the kit together for quick access by everyone.
You can see more about the wonderful, 2 year long, Arts Care Gofal Celf Project shown in the pictures here; The Tumble Commission, parts 1-8
We animals are frequently surprisingly similar and identifying those differences can be really difficult. Furriness or our perceptions built around our relationships can confuse the information and make it hard to see. Skinny legs supporting big bodies or building on larger scale where the weight of the clay is a huge issue causes a lot of problems.
This is the same technique I now use for making heads. A simple clay armature supports the weight throughout the build and gives you a central point that you can work outwards from, allowing that most important key to success: making loads of mistakes and fixing them. You get to avoid hollowing out so that you can play around with textures while you are building. And you will be using the process to reorganize the information in your head: there is no better way to do that than hands-on.
The skeleton is a stick-figure with the right proportions (so important when you are being species specific) set out clearly and unambiguously. Fur, muscle shapes changing with the pose and fore-shortening in photos can confuse you leading to sculptures that are a cross between lifeless, amateur taxidermy and stuffed toys.
The key reason making naturalistic forms is so hard is that our perception (the way we take in our knowledge) that we have built up over our lifetime of what shape the thing is, is based around our general experience of that animal. Making a sculpture of that living, moving, person requires going against what ‘feels’ right and using information we are unlikely to have bothered with before. Portraiture has a system to organise the huge quantity of subtle details. Learning this system will broaden your knowledge, and your access to more knowledge, enormously. That’s why the study of Portraiture and Figurative Sculpture is traditionally the bed-rock of making Art.
The more you practice these invaluable skills the more you will see improvement in all your artwork, your general concentration and your ability to see. Like a pianist ‘doing scales’ you will build up the small muscles, motor-skills and neural pathways involved in this challenging, rewarding activity.
It is not rocket science and you can do it.
Because clay shrinks as it dries and is floppy when very wet, a Clay Armature that will support and shrink with the form through the drying and the firing is invaluable. All other types of Armatures must be perfect in shape or they will ruin the sculpture. And they limit your option to change your mind. Most cause disruption because they have to be removed: clay will shrink as it dries and crack around a rigid armature.
Most techniques for building hollow, coiling or slabs, have a strong ‘voice’ of their own and will influence the final look of the piece. They can demand that you harden lower sections before you can build upwards and you are then unable to change them when you later realize they are wrong. This is a real disadvantage irregardless of your skill level. It is better to work solid over a clay armature especially if you are not using a scale-model and hollow out just before finishing touches. It’s not difficult. That technique is detailed here: Working solid and hollowing out.
Working solid is an excellent method. You set aside the ceramic requirement for certain thicknesses in the clay until you are sure you have the best sculpture you can make at that point. The armature holds the weight up. Some areas can be built hollow too. When you essentially have the look you want but just before finishing touches, hollow it out.
The key to all sculpture is this:
1- Block out the form: decide the dimensions (height, width, length) including the base. Your clay armature will do this.
2- Work in rotations refining the whole sculpture at each turn (by adding or subtracting in the case of clay).
Working on a Small Scale.
Starting small will allow you to get your head around the issues and get results quickly.
Ideally use a clay with lots of grog in it because it will sag less, crack less, fire better or be stronger as self-hardening clay. Here I used Scarva ES50 Crank, an outstanding sculpture clay.
All Pottery Suppliers Online will be happy to recommend clay if you tell them what you want to make. Clays are made from recipes so there are endless kinds. You want a Hand-building clay with fine-medium grog ( pre-fired grit). Throwing Clay for the wheel will resent being an animal and be hard to handle. Many ‘Self- Hardening ‘ clays are over-priced and difficult or unpleasant to use.
Print your chosen animals skeleton to A4 or less size. This is half an A4 sheet. It gives you your height and length for this small sculpture. At this size my horse wont get to thick to fire: my clay has a lot of grog (gritty bits) so I will get away with the sculpture being 4-5 cm thick if it’s fired slowly.Measure the distance between the feet and make a slab-base 1-2cm thick. Guess the width. This base will hold the legs steady until you are sure where to put the pose.Lay clay over the skeleton diagram to copy the basic shape and sizes.Cut between the legs. make a Temporary Support. This will bear the weight and keep the form steady while you work on it. At the end it will be carefully removed. The size and shape of the Temporary Support can be changed as needed at any time.Ta Daa!Photos of the chosen horse will help you place the feet in a good place. They are surprisingly close together, set under the weight of the shoulders (like ours) and hips. Fix them down by blending the clay into the base. This can be changed right up until the piece is dry. You could cut off a leg or any other part and redo it at any time. That’s one of the great things about working in clay.Blocking Out: Do a little improvement to every part of the form then do Rotations again with a little more. And repeat! Layers and layers of work will allow the form to develop evenly. Focus only on the essentials: the proportions NOT details. Each bit affects how the other bits look: you might think the head looks wrong but actually the head is good, it is the neck that is wrong and so on.The movement of working will cause the clay to slump. Check the height regularly by measuring your skeleton diagram. Squeeze the Temporary Support to make it higher. Work on the legs. Use a hair dryer to stiffen it up a bit.Measure repeatedly from your invaluable diagram to get the proportions that will make it look like a horse not a cow or dog!The tip of the tool marks one point, your finger makes the other: hold this and transfer it to your clay.Mark the measurement on the clay. Add or subtract clay. Measure the next bit. Etc.Sketching on the bones after measuring them will improve your sculpture, speed up your progress and increase your learning hugely. You are expanding your knowledge, challenging your habitual ideas, developing your eye for detail and improving your concentration. It is hard, fascinating and massively rewarding skill-building that will enhance your life. Seriously!Notice and model which bits go behind: the bones and muscle of the legs go over the chest and hips. The joints show you where the bendable bits are. Muscles can shrink or stretch.Once your form has stiffened up a bit use tools rather than fingers for better control and a better bond in the clay: pick up a small bit of fresh clay with the tool, dab it on a piece of damp sponge in a dish of water and model it onto the form. Use very little water or you will get a mushy, sticky mess prone to cracking later.Double check the height, lengths. This one has sagged a bit so I fixed that. Focusing on the placement of the bones is much easier than trying to capture the gentle curves of a specific animal. This is still the Blocked-OutARMATURE. You have used the Craftsmanship of Portraiture to get everything in it’s key, horse-like placeNow I have a clear framework for my Creativity to play with! Once you have the proportions right you can create the pose, type, age, character and mood of your animal. A simple turn of the head brings it alive!As you bend the form into your chosen pose look from above and use the spine to guide you so it doesn’t get distorted.Blow-dry it a bit. Now walk away and look at something far away for a few minutes to clear your eyes. Turn back: what is the first thing you notice? That is probably a bit that needs fixing or it might be the best bit. Sort out any problems now. On this one the back legs are set wrong, looks like he’s peeing…Block-out all the details like mane, ears and tail. These parts are very expressive so take time over them in rough and they can be refined in your next set of Rotations.Play around with textures. I’m thinking about the semi-wild Mountain Ponies here in the Brecon Beacons National Park. The style you use should be consistent over the whole form: don’t over-do the face unless your whole animal is very detailed or it will look like a mask. Keep the features in proportion to the skull or it will look like a disease.Use the tail and add plants on the ground to reinforce the legs. Work on the base to make it look as good as the animal.At this point I set my self a very helpful Final Finishing Touches Rule; A minimum of 5 Rotations with increasingly small tools: make additions of clay where ever you spot the need. Change tool and do a rotation of subtraction of clay. Then a rotation of adding etc, until you hit a rotation where you can’t see any more you could do. That means you have done your best on this piece.If the legs are firm enough gently remove the Temporary Support in small pieces and touch up the form.Trim the base nicely and under-cut it a bit to catch a shadow that will lift the whole piece and guard against ugly chipping. Sign and date the sculpture on the edge of the base or under-neath it.Dry your sculpture slowly or the legs may crack as they will shrink faster than the rest of the form. A cardboard box placed over the top is ideal to slowly allow moisture to escape. Self-hardened this will be delicate but last forever so long as it doesn’t get wet. Firing will make it stronger and water-proof. When it is dry/fired paint/wax/stain the surface : a simple all over bronze colour always looks great.
Working on a larger Scale.
I ran the following workshop over two days at the wonderful North Devon Ceramics Academy and Studio. Nicola Crocker and Taz Pollard have created a fantastic, fun, supportive and practical space for learning and sharing creativity in clay. I absolutely love teaching there. Nicola and Taz have a very genuine commitment to empowering other people and sharing their open and imaginative approach to the vast potential within ceramics. The Studio is spacious, bright and comfortable and the atmosphere is friendly, unpretentious and very encouraging.
This amazing group of all experience levels were a joy to work with. And they came up with some great improvements to the technique. You will also adapt it to suit your hands and ideas.
We are using the out-standing Scarva ES50 Crank clay (a stoneware clay with a lot of grog (ground up ceramic grit) in a variety of sizes from coarse to dust making it much easier to hand-build with because of the way it reacts with water (allowing for excellent joins) and it’s superb strength when leather-hard and also when dry. You can use different clays for the armature and exterior but using the same one means everything shrinks at the same rate during drying and firing.
Many thanks to Nicola Crocker for the great photos of the workshop.
The Technique:
Print out skeleton images of your animal, ideally in the same scale as you wish to make your sculpture, images of the whole animal and images of that animal in the pose you want. On to a stiff slab that will be your central support, carefully draw the skeleton. This is an important opportunity to get your head around this animals construction. You can trace through the skeleton using pin-pricks or pressure. But measuring from the diagram to transfer the image will begin the process of clarifying your knowledge of the animal for the purpose of sculpture.Here the skeleton is set clearly in a simple-to-read pose. The sketch is the pose desired. On the clay slab the skeleton is set in the pose. This is not easy to do, takes time and is a huge, worthwhile investment in your sculpture’s foundation and in your skills.Using stiff slabs, stand your central support up ensuring it is nice and stable. Make good joins: while much of this supporting armature will be cut away eventually, some of it will remain and be useful during the firing. Build outwards using images of the animal to assess the widths. Use comparative measurements: the rib-cage is twice the width of the head etc.A narrow, standing figure like a meercat, will need something to support him or he will be and almost worst, look, very fragile. In the figurative tradition acceptable motifs are employed: think of those little shrubberies at the ankles of classic marble nudes statues. Or you can add a second figure and get support, a fascinating narrative and lots of fab negative shapes into the bargain.Supports can added and removed all through the process. This wonderful student, herself a teacher came up with several practical and useful ways to improve this technique.If you are comfortable doing it, build hollow. Or add the clay on solid. At this stage you are still building the frame-work for the sculpture: disciplined measurements will give you a great foundation that will give life to the artwork stage.
Squirrel.
This piece is all about the energy and character of this squirrel. The ‘fluffy tail’ can be a meaningless cliche and has not been used here.
Work right around the form in layers giving full attention to the whole sculpture at each rotation. It is extremely important that you are always willing to cut off parts that are wrong no matter how long you worked on them. A beautifully crafted eye will look grotesque in the wrong place.Once your form is completely blocked out, with all proportions correct, switch to using tools to apply the clay rather than fingers. You will get a more attractive, stronger surface and can be more specific. A good habit is to go all around adding. Then all around subtracting, repeat until you can’t see what else could be done better at this point in your progression. Then hollow if necessary. Then do finishing touches (with small tools) Then poke a needle hole into any area that might contain trapped air.Add other types of supports if useful but remember they wont shrink with the form during drying so they can cause cracks.
Birds
Making birds is notoriously difficult because of their insane relationship with gravity. Work slowly in stages allowing the parts to firm up and add to the support system. Remove parts of your clay-armature cautiously in small stages.
This flying bird will be set on a base as yet un-determined. The armature holds the pose well on this very tricky piece allowing it to change and develop.Flying Bird.Flaying Bird.A Crow. This flexible technique can take you places you hadn’t thought of. Here the internal space has become part of the sculpture.A Crow. Because the weight is supported and the skeleton provides strong boundaries you can play and feel your way around the form. The finished piece will need it’s own supports but here you can try various alternatives until you are happy with the look, strength and feel.A Crow. Lots more trial and error will happen to this fascinating bird-scape in the next weeks.Flying Bird. Take breaks, look out side to clear your eyes then glance at your sculpture and note what you first notice. If you hit a wall with it cover with a bag and walk away! I sometimes leave sculpture wrapped for months. I check regularly to mist with water and see if I can move forward again. Taking photos can be a good way to get some perspective. Ask others ‘what they see’ and compare that to what you want them to see. A dog that looks like a donkey has too big a head and too-tall ears for example.
Giraffe
A wonderful form where negative shapes play a stunning role. Their grace and movement is enchanting and very tricky to capture.
Giraffe.Giraffe Five points of contact with the ground could give this piece stability but at this small scale those legs and feet are still so small. This elegant solution, where the central support is tidied up attractively and immediately becomes neutral, eliminates the distracting fragility.Giraffe.
Wild Boar
This animal is iconic and has held it’s place in art for Millenia. It’s bulky form and thick fur can easily be over generalised into a blob on sticks. Here the skeleton secures the integrity of the structure. This sculpture is about his power and movement.
Wild Boar This piece will be completely cut away from it’s supports once it is firm to retain it’s shape, rested on foam and a hole made for a metal pin and base that will show off it’s galloping form once it’s fired.Wild BoarWild BoarWild Boar The details of the face should be in balance with the rest of the sculpture’s texture and level of detail. At this small scale it is also a mistake to try and put on complicated detail. It will take a lot of time to find what can be left out. The skull will give you the clues: it is the structure of the face that matters.Wild Boar
Cats
Cats are extraordinarily flexible and their exterior hides their structure. Making pets can be very difficult because we have so much knowledge of them that can cloud the sculptural information. Use the skeleton to keep on track with proportions that our nutty perceptions may think are similar to humans!
Crouching CatStanding CatStanding Cat. Note the bend in the legs which is usually obscured by fur and the loose skin that allows cats to stretch so much. Standing Cat It is too soon for superficial details like ears. Focus on the key structure. This is still at Armature stage and it’s all about applying the Craftsmanship of Portraiture at this stage. The Arty, creative bit goes on top of that excellent, species-specific structure.Crouching Cat. The position of the bones and the length of the legs is very confusing and tricky to get right. Divide the problem into manageable steps: Focus on the joint, they tell you where bends should be. Be sure the joint is in the right place. Measure the bone’s length and swivel it from the joint. Move to the next joint and bone. Etc.Standing Cat. This excellent, strong, central support allows you to place the legs where you want them on both sides to create the pose. Then the legs will stiffen and take on the extra work of holding up the weight of the body. The base should stay in place in the finished sculpture as it adds to the stability and strength of the legs. So, later that base can be made attractive.Crouching cat. Early stages with this one where it clearly wanted to be bigger! That was easy to change. Crouching Cat. A beautiful, gentle way to address the eyes expressively, in keeping with the form.
Dogs
This student had gorgeous pictures of her adorable young dog, especially his loving face. But at this small scale she focussed on his movement and energy to portray him. She will paint his distinctive markings on in colour.
DogDog Keep re-checking those measurements at every stage.DogDogDogDog The central support is removed gradually and with great care.Dog The armature is cut away (but continues to function usefully inside). Needle holes will be poked up into the form to vent all the air pockets made by building hollow. Then a hole will be placed for a wooden dowel set in a base to display this dog leaping as he runs.
Meercats
These little guys have tiny feet and very slender legs. You could build some grass or rocks around their lower legs to give stability. Or add a friend.
MeercatsMeercatsMeercats Like the giraffe parts of the support wall could remain and no-one would notice because the charm of these characters and their friendship is far more engaging.Meercats
Otter
This up-right stance gives similar problems to the meercats but the way otters stand gives plenty of attachment to the base.
OtterOtter An otter’s simple form can be very difficult to capture. His gesture and poses are well recognized so that helps. Starting with the skeleton puts the key points of his body in the right place under that silky fur. There is a lovely change in loose to very smooth modelling on the surface that recalls water running off the fur.
The Horse
Like many big herbivores, horses have surprises in their skeletons that are key to their shape. A ridge of spurs along the spine limits over-flexing but also keeps predator teeth away from the precious spinal column. It defines their characteristic silhouette. The skull seems bizarre but get that blocked in well and the head will look great, even in a small scale.
HorseHorseHorse Follow the transition points of the legs very carefully. Note how those big neck muscles cross and attach behind the shoulder blades. At this stage it is almost as if the legs are just attached to the edge of the body but you now know those leg bones go right up near the spine and have a wide range of movement which can be gauged by measuring the length of a bone and pivoting it from it’s socket. It was suggested that you could cut up a spare skeleton in order to make a hinged ‘shadow puppet’ that could be helpful in designing the pose from a standing skeleton.Horse Taking full advantage of the central support.Horse
Armadillo.
These guys go well out of their way not to look like animals all! They have extraordinary skeletons, well worth studying. But it has to be said that apart from getting proportions right, the hard shell-like outer skin means you see no clues of the bones showing on the armadillo’s surface. Their shell is a very subtle, beautiful shape with exquisite patterns.
Armadillo This student did all the skeleton work as part of the workshop. But then he switched to working solid/hollowing (this link takes you to a post specifically about that technique) out as a technique far better suited to armadillos.Armadillo On solid clay use your skeleton to identify the right proportions.ArmadilloArmadillo Use a serrated kidney tool to shape the body. Then use a flat wide modelling tool to add clay and further refine that gently undulating form.
Your central, weight-bearing support does not need to be flat/straight: Both of these abstracts below were built outwards from a stiffened, curvy, up-right central shape of various thickness set on a metal rod. You can see parts of the original central support where it became part of the final form, much like the sculpture of the Giraffe above.
Antarctic Harbinger III, 26cm H x 37cm W x19cm D.Antarctic Leviathan, 45cm L x 23cm H x 12cm D.
Quality Joints:
Genuine joins are formed when the chains of platelet-shaped particles from each section inter-lock. Picture a magnified image of hair.
Score marks do not give the surface ‘tooth’; they allow water into the clay-body. On vertical surfaces they hold the water in place to give it time to sink in and swell the clay so that the platelets are able to link with other platelets.
Slip is not ‘glue’, it is clay particles spread out in water and has little strength, especially when it has dried . It is ideal for holding a lot of water in place to give it time to be absorbed to soften the area of leather-hard clay.
Once both edges are softened put the pieces back together and move them back and forth until you feel the edges lock together. Manipulate the softened clay at the join to encourage further integration of those particle-chains and to disturb the straight line of the join; cracks love to zing along a nice straight slip-weakened join during the firing when the pull of shrinking stresses the sculpture.
Thicknesses: cracking/breaking.
How thick the clay can be to fire well depends on the amount of grog (the gritty bits of pre-fired clay ground to specific sized grit/dust that gives improved structure and resilience to your clay), the denseness of your modelling style, drying time and the speed of your firing.
Air bubbles trapped in the clay will expand with the heat. Grog and/or a loose surface will allow the air to seep through the clay. The same is true with water but steam expands fast. If your piece breaks into big bits during the fire it was trapped air and you will be able to see where the bubbles were in the shards. If it blows up into a trillion smithereens it wasn’t properly dry!
Drying:
I dry thick sculptures slowly under plastic which I turn inside out ( to avoid condensation pooling) daily for 4 weeks minimum and then 1-2 weeks in a plastic tent with a dehumidifier. A card-board box makes a great, slow, draft-free drying chamber. A long dry allows the water to level out, as water loves to do, and that will enhance the structure of the clay within it’s new sculpture shape. You will get less cracks or distorting in the fire.
I fire very slowly with an 18 degree C rise until 600 degrees C. then onto full power up to the desired temperature.
Generally 3cm is a fair maximum thickness for a well grogged clay.
How To Make a Head is essentially the same method and you will find it helpful. It talks about human heads but of course is relevant to all heads apart from the handy option of being able to measure with callipers from your own.
To get the best out of our modest budget we used some new techniques and on my 1 year maintenance visit to this the lovely site I was hugely pleased to see they have worked really well. Despite a very harsh winter the sculpture looks fresh and is weathering in a uniform, gentle way. The moss is slowly collecting in the deep textures as planned.
The lovely, thoughtful planting has re-grown beautifully, complimenting the form perfectly, softening the site and integrating it into the lovely woodland which is overflowing with flowers and birds.
The paths are still level, easy for patients to use and now look like they have been there forever.
While I was there working a lot of people strolled by. They said this had become their sanctuary, a moment of peace and escape from the pressures in the hospital, where they could revive. This is exactly what we wanted. A wonderful result.
Everyone is welcome to visit this stunning spot at Bronllys Hospital grounds in Powys, Wales.
You can read the whole story of this wonderful project, including how the sculpture was designed with local people and built at Osprey Studios, in the other Marking Time posts here on this site.
I am proud to say we have poured our hearts into this marvellous project. The amazing pupils, their awesome teacher Miss Bygate, the extraordinary Head Ms Hanson and all the dedicated, kind, thoughtful and very patient support staff were willing to really go for it and gave us all the encouragement and back-up we could possibly need.
After Headmistress Ms Hanson’s really lovely introduction Daniel read out some of the story
The moment we have been working for! A nod from Ms Hanson and this sculptural playform is covered in excited kids at last!
The pupils wonderful art work about what their character was doing during the story is set well into the coloured cement to protect it from play activity. This has given it a mysterious, ancient quality, like revealed carvings of a disappeared civilisation.
During the design phase the pupils were clear that they wanted the sculpture to inspire other children to make their own stories. There are tunnels and hidden places.
The sculpture is set facing the rising sun in a circle of established young deciduous trees, across from a big ground-work playform castle in the far corner of the huge play-ground at Pennard Primary School. This area is often used as an outdoor classroom and is a wonderful, magical, sheltered spot for free imaginative play.
In the background, ever ready to step in and help is Hugh Blackwood, the school caretaker and artist who makes beautiful jewellery. He was invaluable during the installation, an out-standing assistant.
It was a joy to see this amazing group again, show them their book and talk about their new ideas.
The extraordinary Headmistress, Ms Hanson and some of her very proud pupils.
The Throne, Pennard Primary School, Pennard, Gower, Wales, UK. By Osprey Studios and Pennard Year 5 2017.
Year 5 had made us a fabulous card with drawings of each character.
Kind, beautiful, creative and very dedicated Miss Bygate with her fabulous class and Daniel on the sculpture they have made with Osprey Studios for every future generation at their school.
The upper part of Pennard Primary School’s sculpture is complete, cut into sections and drying. It has been a joy to build. The pupils panels and tiles for the lower half are drying beautifully. I’m putting together the Book now and it’s lovely to review the wonderful time we had with this fabulous group.
The Lead Creative Schools Scheme aims to promote new ways of working in schools, providing the opportunity to develop an innovative and bespoke programme of learning designed to improve the quality of teaching and learning.
It’s about the school and the particular learning challenges that it is facing. A Lead Creative School will have access to creative people, skills and resources to support them and to address these challenges.
Osprey Studios won a placement in the excellent Pennard Primary School.
Three Cliffs Bay, Southgate, Gower.
The planning meeting was the best I’ve ever been to: very positive, practical and down to earth. Our Area Lead Artist, Photographer Lee Aspland, Headmistress Ms Hanson and her lovely, thoughtful teachers were flexible, supportive, very kind and clearly up for something exciting and challenging. They set the bar high and their dedication is inspiring.
Writer Daniel Archibald Buck has collaborated with Osprey Studios for years. Here he describes his 5 days of intense, immersive, and hugely enjoyable workshops:’On Thursday 2nd February year five set out on what many would consider a herculean task: To write and perform an epic tale, with no preparation or script, in just five days.
To put that in context, a two hour film can spend up to five years in production, and will likely focus on just a few characters at a time. This story would be much longer, and have as many as thirty three characters throughout – one for each member of the class.
On day one, the focus was clear, we were never going to all be on the same page unless we had a framework we could all share. So after some practice in the hall standing up and getting our brains in gear, we sat down to learn The Story Circle, based on Joseph Campbell’s text The Hero with a Thousand Faces.
This is a stripped-down version of a degree-level screenwriting technique.
Spoiler alert, that circle contains all the work we noted down at the end of the project.
Over the course of a day, we went from writing simple three line stories with just a beginning, middle and an end, toward struggles about heroes overcoming odds and clashing with difficult challenges.
On day two, it was time to decide who our heroes were, and why. We started to develop ideas about Character development in depth, both in performance and in writing. Creating a character on the fly on stage in front of a group is a very different challenge to writing out facts about a made up person on a piece of paper. The kids were challenged with portraying a character’s job and emotion with acting alone in front of the class, and then with putting those characters together into scenes in which invented problems forced them to question how a certain person may react in a strange situation.
I don’t know if you’ve ever stood up in front of a group of your peers and pretended to be in a crashing airplane with no script, but it can be daunting, not least because something funny is bound to happen, and it can be hard to delineate between those laughing with you, and those laughing at you. The enthusiasm on display was impressive.
From there, we sat down to create a character in depth. Each person got to invent their own person, with fears, and hopes and dreams and special powers if they wanted. these characters would go on to become the focus of our story in the next few days, so they had to rich and vibrant, and stand up to scrutiny. Here are a few (pulled at random):
Charlie, a Twelve Year-Old Orangutan from Vine Village, who wants to the King of the Jungle, but who is afraid of Tigers.
Flames Boy, a Thirty Year-old Businessman. He lives in an ordinary house and drives an ordinary Lamborghini. He’s a super hero in his spare time.
Dr. Pepper, who is from California and is afraid of children. His Nemesis is Pickled Onion (who is a Pickled Onion).
Next we set about making masks, to represent these characters, so it would be easier to tell when we were acting and when we weren’t. Of course, it can be hard to create a mask that accurately depicts a sentient pepper pot, so in most cases it was decided to settle on a colour or a theme for your character, and to make the mask represent that.These were then left to dry over the weekend.
When we got in on Monday morning, it was time to get down to business. We had three days left to create a satisfying narrative, to explore each of the characters we had made, and to make sure that everything was recorded and that all the ideas and themes we stumbled over on our journey were explored and understood.
After a warm up and some improv exercises in the hall, we ventured out into the grounds despite the cold and the wet, to stake a claim on this land for the characters who now lived there. It didn’t take long for our introductions to take a turn, and within the hour, spurred on by a vocal contingent of the group who advocated character-on-character violence, we had a succession of people standing up and delivering impassioned stump-speeches on the moral balance between violence and peace, good and evil.
But when there were no more words to utter, it became clear that there was only one recourse left by which this dispute may be settled. Those who advocated aggression saw that their counterparts for peace would not engage them on their terms unless a show of force was demonstrated. War was declared.
And so began the main chapter of our tale, which is now being chronicled and will be set into writing and told for seasons to come you can be sure. There was war, a bloody dictatorship, a desperate rebellion, economic prosperity in bleak times, devious subterfuge, assassination and resigned democracy. And in the end who can say whose side the historians will take?
Well, we can!
As the artists and historians of our own tale, it is now to the class to decide how the epic struggle will be remembered. Working with monument ceramicist Rebecca Buck, they are undertaking the construction of a great totem, to be erected as close as is practical, to the place where their characters first awoke.
It will take the form of an eternal throne, upon which you can depend many kings and orators and dictators and prophets will take their place, for it will stand for many centuries (indeed, it will likely outlive the school so long as it is not purposefully destroyed) and will we hope, not only affirm to generations as yet unborn that this school was lived in and played in before their time, but also that their struggles, their games, their questions are themselves eternal ones.
What is heroic? How can we be strong? What determines the right to lead? How do we shape our own lives, when there are always those who will try and shape them for us?
I, having had a chance to get to know them and work alongside them, am immensely proud of year five. They rose to the occasion admirably, and proved themselves capable of tackling ideas and problems above their regular curriculum. They created challenging and evocative ideas that broke the regular mold that is so often written off as ‘just kids stuff’.
If you as a parent want to get involved in the last stages of the project (particularly the Sculpture Installation), please get in touch with the school, and stay tuned for information on our grand unveiling over the next few months, where we will show off the monument to the world and were there will be a dramatic retelling of the tale we wrote.’
I sat in on these fantastic days to collect information for the sculpture and souvenir book for the school’s library. Occasionally a pupil would sit and draw with me if they needed a some perspective on the workshops but the vast majority of the time they were having far too much fun. They did give me lots of valuable feed-back on the ideas. It was wonderful to witness how deeply involved all the pupils were with the story they were creating. Miss Bygate, the very sensitive, gentle and inspiring form teacher, was there for her children giving encouragement and direction.
This process was, without doubt the best, most efficient and most productive form of ‘consultation’ I have ever had with a group.
We spent a lovely afternoon getting know the clay, Scarva ES50 Crank, and each other’s strengths in describing ideas with it.
All this work was photographed and recycled.
We had a well earned 4 day break which I used to make the scale model. I had a lot of great material. At the very outset we had agreed that the pupil’s ideas were to be at the centre of everything. Discussions with the kids during breaks developed the perfect vehicle for memorialising their story and sharing it with everyone else in play-ground: a magnificent throne incorporating scenes from the story in relief. There would be tunnels in a dynamic shape that will inspire creative narrative play. Pennard’s dramatic history and landscape would be featured to high-light the story’s context and link the future play there.
The top half of the sculpture would be ceramic and the lower half the same golden cement over blocks I used on the Marking Time sculpture in Bronllys Hospital grounds. The colour and texture match is really good. Some of the ceramic panels and tiles will be set into the cement as well.
Ms Hanson joined me and the pupils to walk the wonderfully large play ground that has a choice of landscaped areas that lead imaginative play. It is small wonder that these children are so bright, forth coming, creative and ingenious: Every member of the staff are committed and dedicated to empowering all of their pupils and enriching their potential. The school has a fabulous team of Volunteers that help them get maximum value from their very tight budgets. It was an honour to be part of it frankly.
We talked health and safety, budgets, prior and future uses of each area, took some measurements and chose the perfect spot in the centre of a circle of young but well established deciduous trees near a big mound with a tunnel and castle fortifications. A wooden play structure on the spot needed removing so we could accommodate that in our budget. I love to see money working hard.
The next Monday everyone accepted the scale-model and we went ahead to make the relief panels that would be set into the sculpture. This a fab, very cost effective method for getting the hands-on art-work of people onto a large form.
The pupils worked incredibly hard for 2 solid days. Their panels are wonderfully varied and beautifully made. They helped and supported each other and me. And we had a lot of fun. Once their panel was completed a team formed to make a small name tile for each person involved in the project. Another team made round mini-tiles with a stem to anchor it securely into cement. These will set off the panels nicely across the form. Miss Bygate was a star and kept everyone going and even helped load up the van. She is amazing. I drove home on cloud nine. Excellent art-work, a perfect sculpture site, a budget that would be thoroughly squeezed dry and a scale model I knew was right because the consultation was so immersive and genuine.
Daniel had run a Workshop for parents and pupils so that they could get a feel of what their children were working on. I did one for them in using clay for learning and play. I was very pleased and not surprised to find that these parents were already well into doing stuff like that at home. Miss Bygate set out a lovely display of really good photos that she had taken all through the workshops. Then she gave them to us for the Book. Similarly my short workshop for the staff mostly confirmed what they were all ready doing. The post How to use clay in Primary Schools affordably will be useful.
I’m on day two of the build at Osprey Studios.
The Pennard scale model in front of the build in progress of the upper, ceramic section, of the sculpture.
This is the first half of the framework. The final piece will be 130cm high, 2 metres wide and 1 metre deep. Once the framework is complete, with the section cuts and firings planned, I can add on the pupil’s and my own art-work. This will develop the thickness and strength of the walls. The clay is Scarva ES50 Crank, the same clay the pupils used. It will be fired to 1260 degrees C and turn a soft golden yellow that matches the white cement/golden kiln dried sand that will be used for the lower section and all joins.
The Marking time sculpture is built and cut into sections. Each part will be prepared for a long managed drying and a very slow firing.
It has been wonderful work. Very challenging and engrossing. The scale is great: I spent a lot of time working with-in the embrace. The supports worked really well, didn’t get in the way and there has been no cracking at all. Scarva ES 50 Crank is an outstanding clay.
The edges are sharp and there is good variety and rhythm in the texture. The sculpture changes as you walk around it, with that rhythm creating unity and a flow that draws you in.
Once it is installed I will use the earth pigments that have become a really valuable material in my work recently, to add a thin white wash over the whole piece. The soft yellow of the clay will glow through the white and in the dappled shade of the woodland we will get a dream-like radiance. Over time the moss will add the finishing touch, making the form part of the place.
The Red Kite, which represents the community supporting military from all angles with love, strength and unity, is very overt. During the consultation people spoke about a dragon in the mist, etherial, a force of nature. The dragon is there in the form making the embrace that shelters, guards and protects the vivid, swirling blue mosaic which is life. The dragon’s face shifts, the eye changing with the light.
I have put blue underglazes on the wonderful mosaic pieces made by the fab pupils of out-standing art teacher, Ross Bennet, at Llandrindod Wells High School. The colour will deepen in the fire. A range of rich blue, high-quality glass pebbles will be set with these ceramics in the middle of the embrace.
The 3 corner-tiles have soft blues added. They will also deepen in colour and have the same satin-matt texture.
The 3rd corner tile will be done with Mount Street Junior School in Brecon. It will have the story of an army joining forces with a dragon that is shown in part 2 and the tri-corner celtic knot will feature again.
This time we used a tricky technique of building hollow and looking at portrait skills because the participants were sophisticated and really skilled.
Join-In Sculptures are great fun and full of learning opportunities. I have done these with adults and children at Events and Parties ; Everyone adds their bit until we have a fabulous sculpture. Photos are taken and then we re-cycle the clay.
They can be adapted to fit any group or space. The key is for it to be a challenge to create the excitement and the rewarding achievement. Because all the clay is recycled, they are a cost-effective way to give people a chance to experience quality materials, tools and the challenges and buzz of making something on a large scale. Hesitant participants get a lot out of their contribution being part of something complex and big.
Making a Zoo complete with 4 toilets, a car park and an over-looking military complex. We worked on this all day, took photos and then squashed it all up. Fantastic fun, lots of skill sharing and teamwork.
Clay is a fantastic material for kids. They relate to it immediately and it usually engages their attention for surprisingly long periods. The majority of Pupils will learn best when their hands are busy. It is the 3D equivalent of Drawing; it’s not just for arts and crafts; it’s versatility and affordability means it can be used to enhance all sorts of subjects even maths or history. Many children will find expressing and accessing their ideas in 3D much more natural than using 2D and for some it will be much easier than using words.
Theatr Brycheiniog’s Kid’s Zone at Brecon Jazz 2014
Theatr Brycheiniog’s Kid’s Zone at Brecon Jazz 2014
A Join-In Sculpture with The Big Skill at Archaeology For All in Merthyr.
The quality clay is the important item. Clays are made with recipes and therefor there is an infinite number of types of clay, each with particular properties. ES70 is absolutely lovely to use; it feels very nice, it’s not sticky, it doesn’t stain, it’s easy to clean up ( on carpet let it dry + brush out), it’s not irritating to sensitive skin and you can eat it! Most importantly it is very easy to use so people get good, rewarding results quickly. Beginners deserve a great material that will reward their bravery for trying something new and give them fab results that will spur them on.
ES70 works very well as a self hardening clay and can be decorated with poster paints once it’s dry.
Plan to recycle all the clay, even if it’s painted or has dried completely. Explain that the clay is expensive so you need to keep it for next time so that they don’t think it’s because you assume they will make rubbish! Pupils are usually perfectly happy to let it go. Often it takes the pressure off to make a ‘product’ and they can relax and enjoy the making part more.
Clayton The Rottweiler has a full set of internal organs including a working bladder! At the end of the session we recycled the clay.
With The Big Skill at the Monmouth Show.
At the Usk County Show.
The Join-In Sculpture brings people of all ages together.
Re-using the Clay
-At the end of a session drop all the clay back in the bag. (lots of pupils will love smashing the work up!)
-Put bag in Bucket
-slowly pour a cup or so of water over the clay in the bag to soften the clay.
-Close bag w/ twisty
-leave over night or longer.
-place bag on floor and step on it a few times to “knead” the clay, turning bag a few times.
-Voila! It is ready for use. You can re-cycle your clay endlessly.
!? Bag goes rock-hard; Allow to dry completely, drop lump on floor to break up, put pieces in bag and recycle
!? Bag goes quite hard; knock holes all over lump.(hammer + screw driver= surprisingly satisfying task!) Return to bag and recycle.
!? Bag goes too squishy; Tip clay onto a board and allow to dry until useable. “Knead” a few times over the day (or two) so that it dries evenly.
For larger quantities of clay recycling click here.
Storage
-Always close bag tightly w/ twisty
-Ideally store in a handy frost free place but it doesn’t matter if the clay freezes.
-Ideally have the bucket on wheels as 12.5kg is quite heavy (plant pot wheels – Home-Bargains, £1.99.)
Mount Street Junior School, Years 3 and 4 making a model of a town that cares for and supports it’s Military members. This time the Join-In Sculpture played a key role in the community consultation phase of the Bronllys project, Marking Time.
Fibre artist Emma Bevan’s Ffolkyffelt bring people together with new ways to express themselves.
Working for The Big Skill takes you to all sorts of great places and amazing people. The equally awesome and broad-thinking group, Herefordshire New Leaf brought us in to spend the day with SHYPP in Leominster.
The wide mix of people at SHYPP are wonderful. They are working together, supporting each other, daring to be open and creative even in one of the most difficult situations anyone can face. Being homeless is a nightmare especially if you are so young. Their website describes the work they do project perfectly:
“SHYPP provides 16 – 25 year olds across Herefordshire with housing, training and employment opportunities.
We provide a range of accommodation suitable for young people at different stages of their lives including foyer accommodation, move on flats, shared houses and supported lodgings.
We are not just about accommodation we work with young people through training programmes and a wide range of activities. SHYPP wants to give Young People the opportunity to develop independent living skills, identify their talents and go on to live happy and successful lives. SHYPP also provides floating support to assist Young People in their own homes, enabling them to access accommodation, maintain accommodation and help with debt management.
SHYPP is a service driven by what young people want, this means projects develop according to their needs.”
The Big Skill goes well out of it’s way help fab groups like SHYPP to fulfil their best ambitions and it’s great to be part of it.
The Join -In sculptures are excellent: they can be adapted to fit any group or space. This time we used a tricky technique of building hollow and looking at portrait skills because the participants were sophisticated and really skilled. The key is for it to be a challenge to create the excitement and the rewarding achievement. Because all the clay is recycled, this is a cost-effective way to give people a chance to experience quality materials, tools and the challenges and buzz of making something on a large scale.
One of the best parts of this day was that Kevin, a sculptor local to Leominster came along see the Join-in Sculpture in action, learn about the possibilities and try out the Scarva ES 50 Crank clay so that he could offer this workshop. They bought the clay at the end of the day. Perfect.
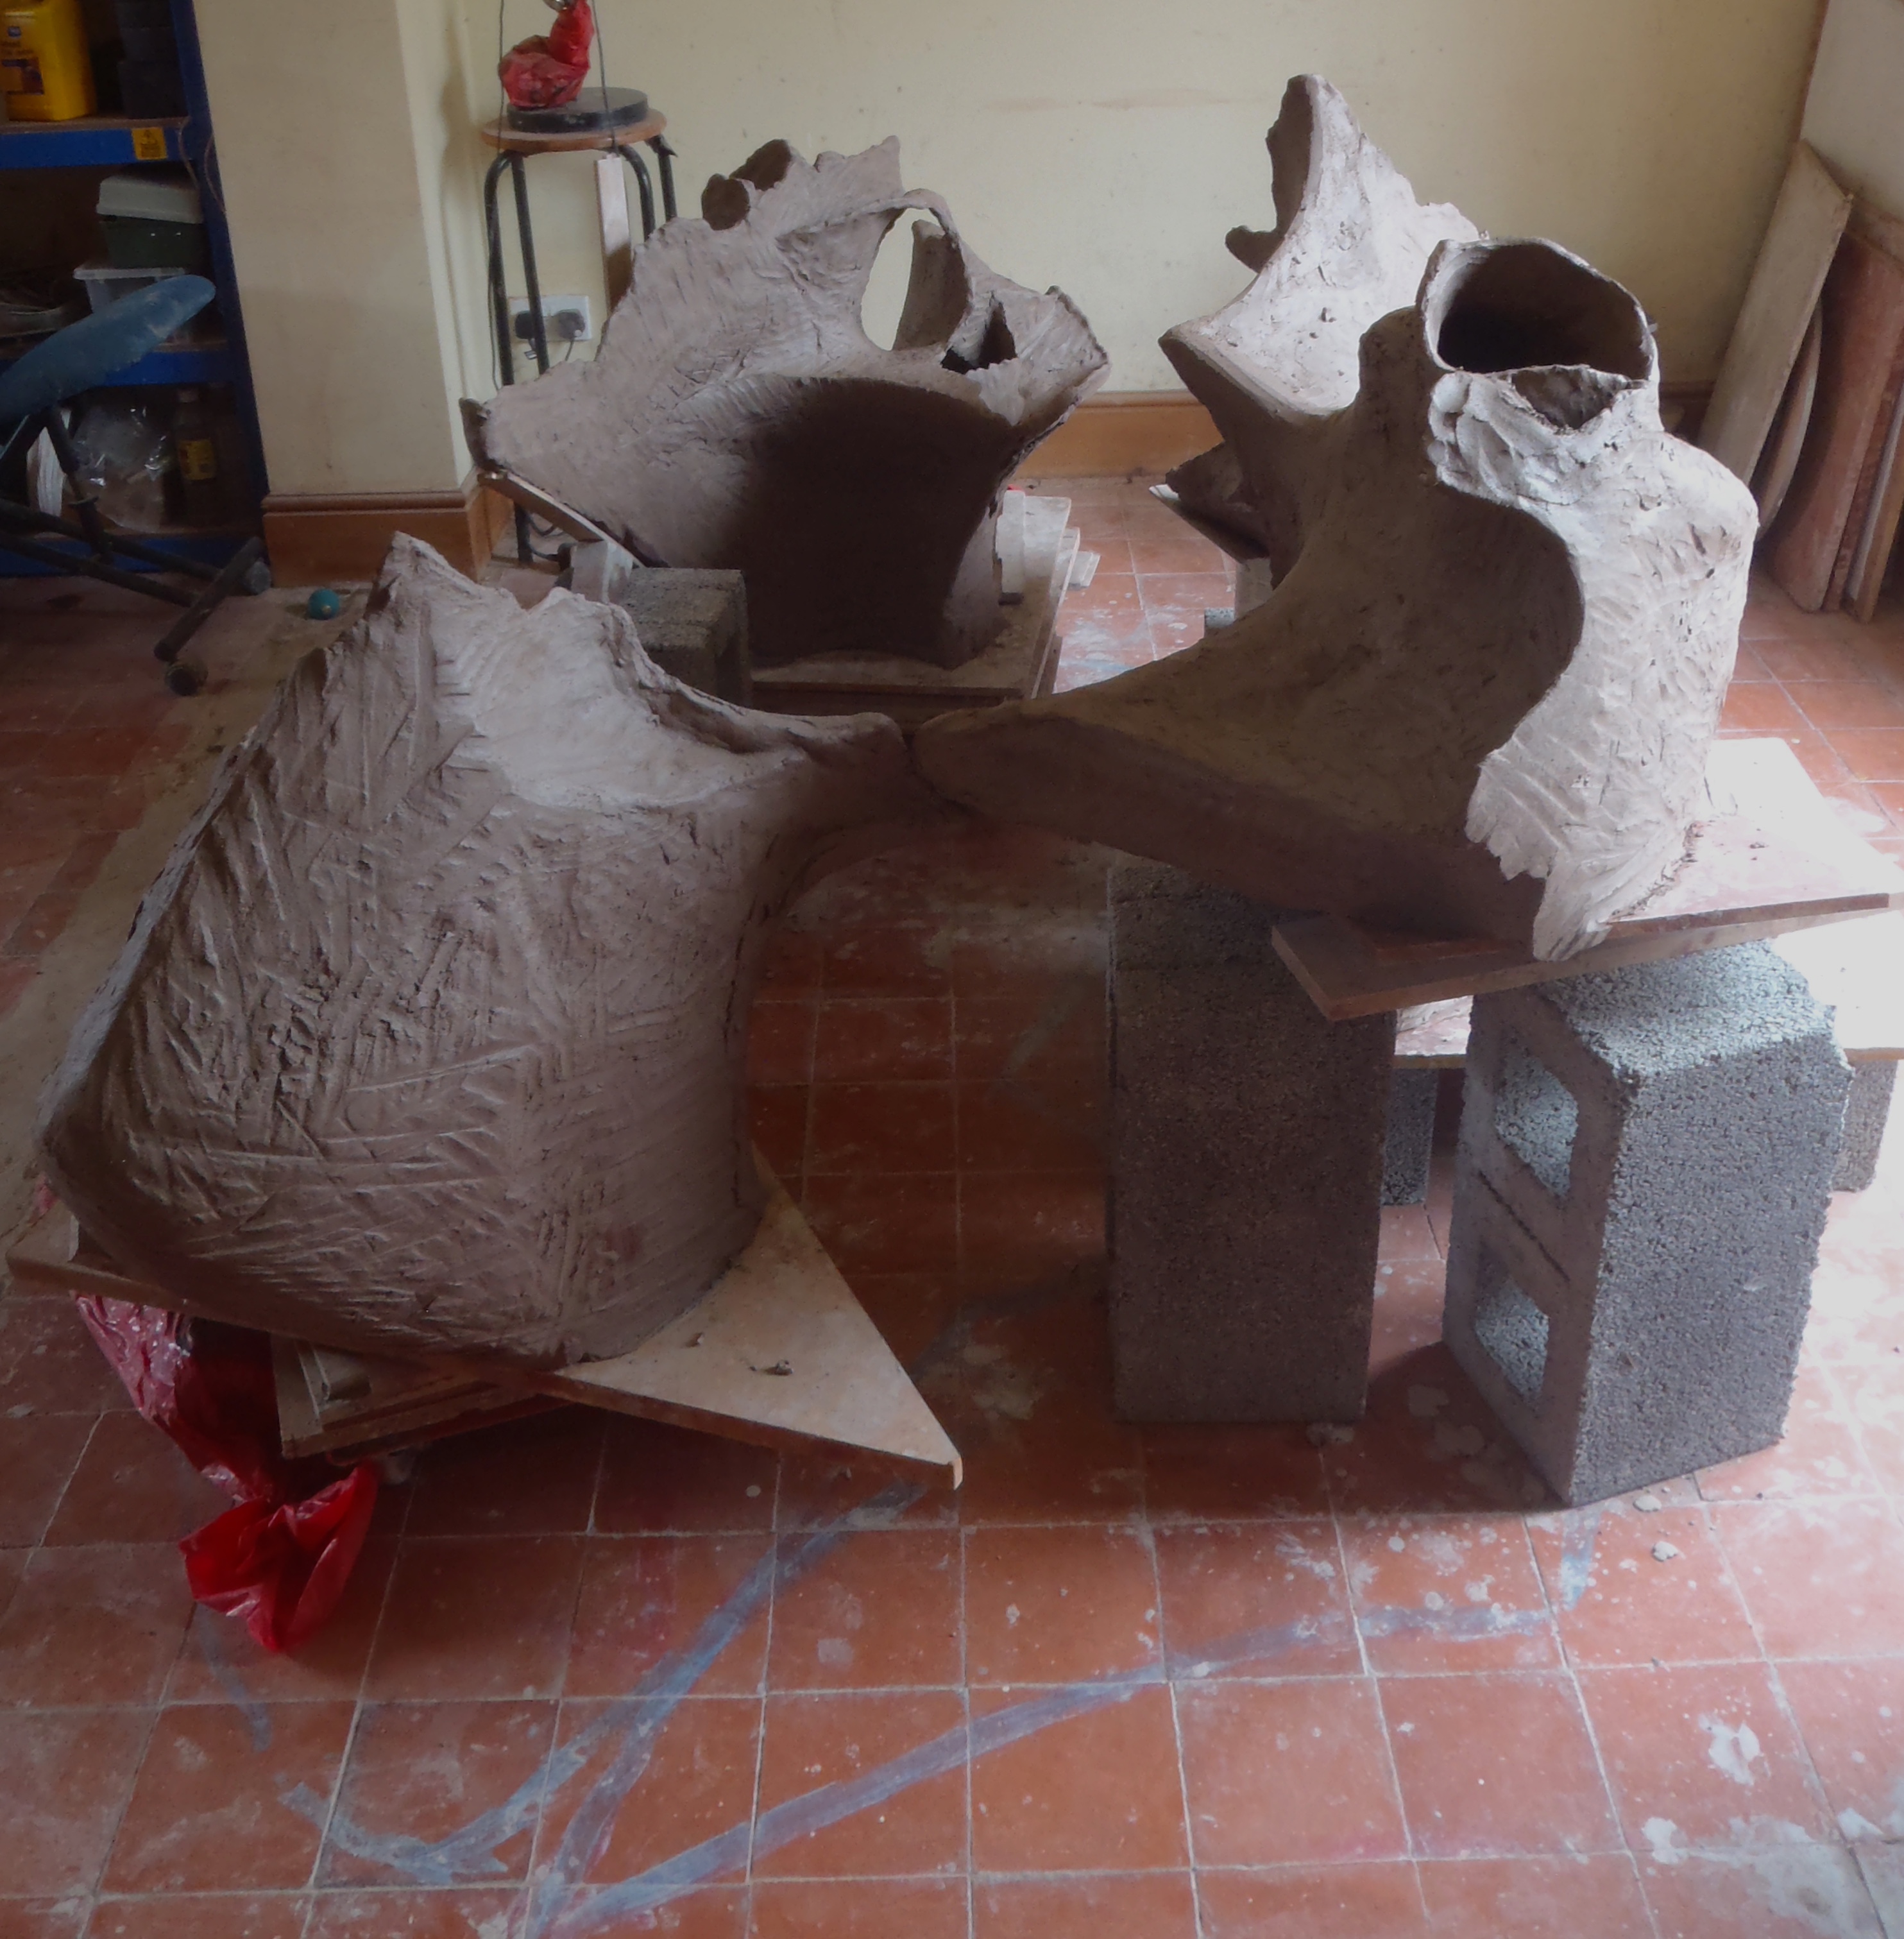
Working on a large scale means returning to the same form everyday for months. So you need to be sure about the design.
I’m really pleased with the scale of the Marking Time Sculpture. It is within the human scale range so that the embrace and eye level of the dragon and the kite/guardian’s wings will feel very personal.
Marking Time scale model.
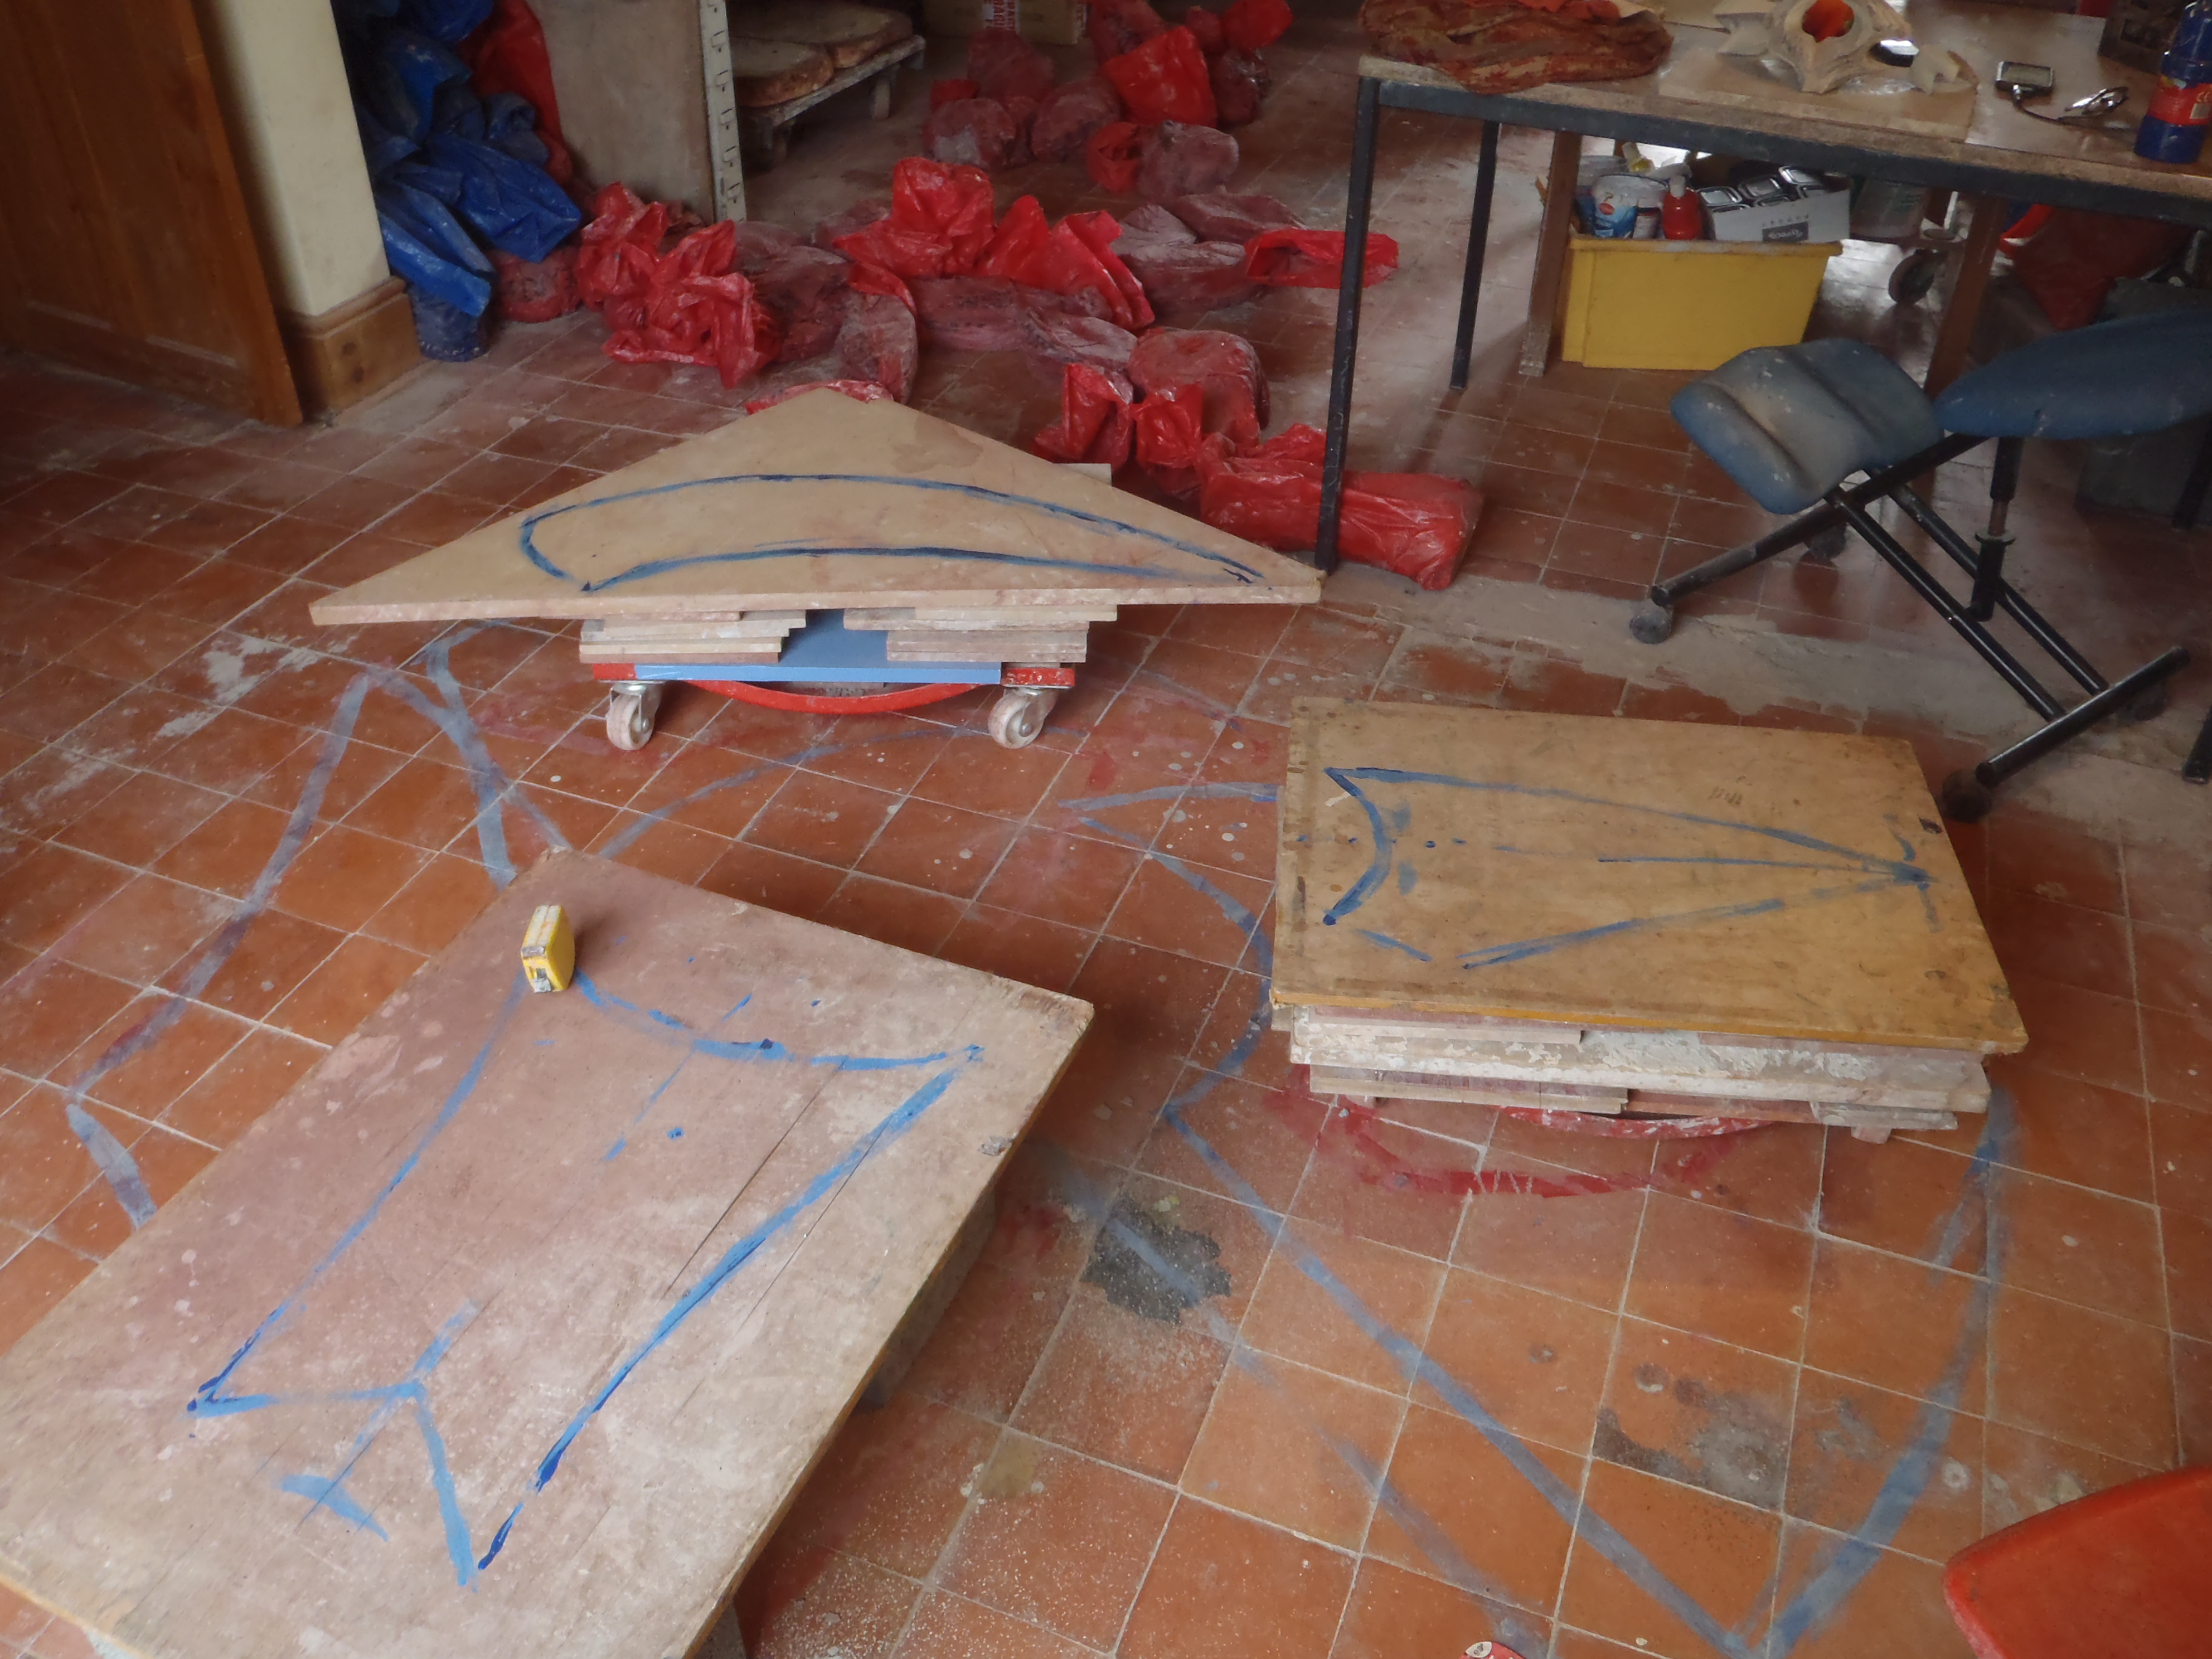
Osprey Studios has a flexible layout and a solid floor so that anything up to 6m x 3m can be built there which keeps costs down.
The base foot print was painted on the floor in red and the outline of widest/deepest edges painted in blue to check that there will be space to work around the forms. The largest section is set on blocks to give the height of the eye-line. The other 2 sections are on wheels for easier access. The base footprint is painted on the boards in blue.
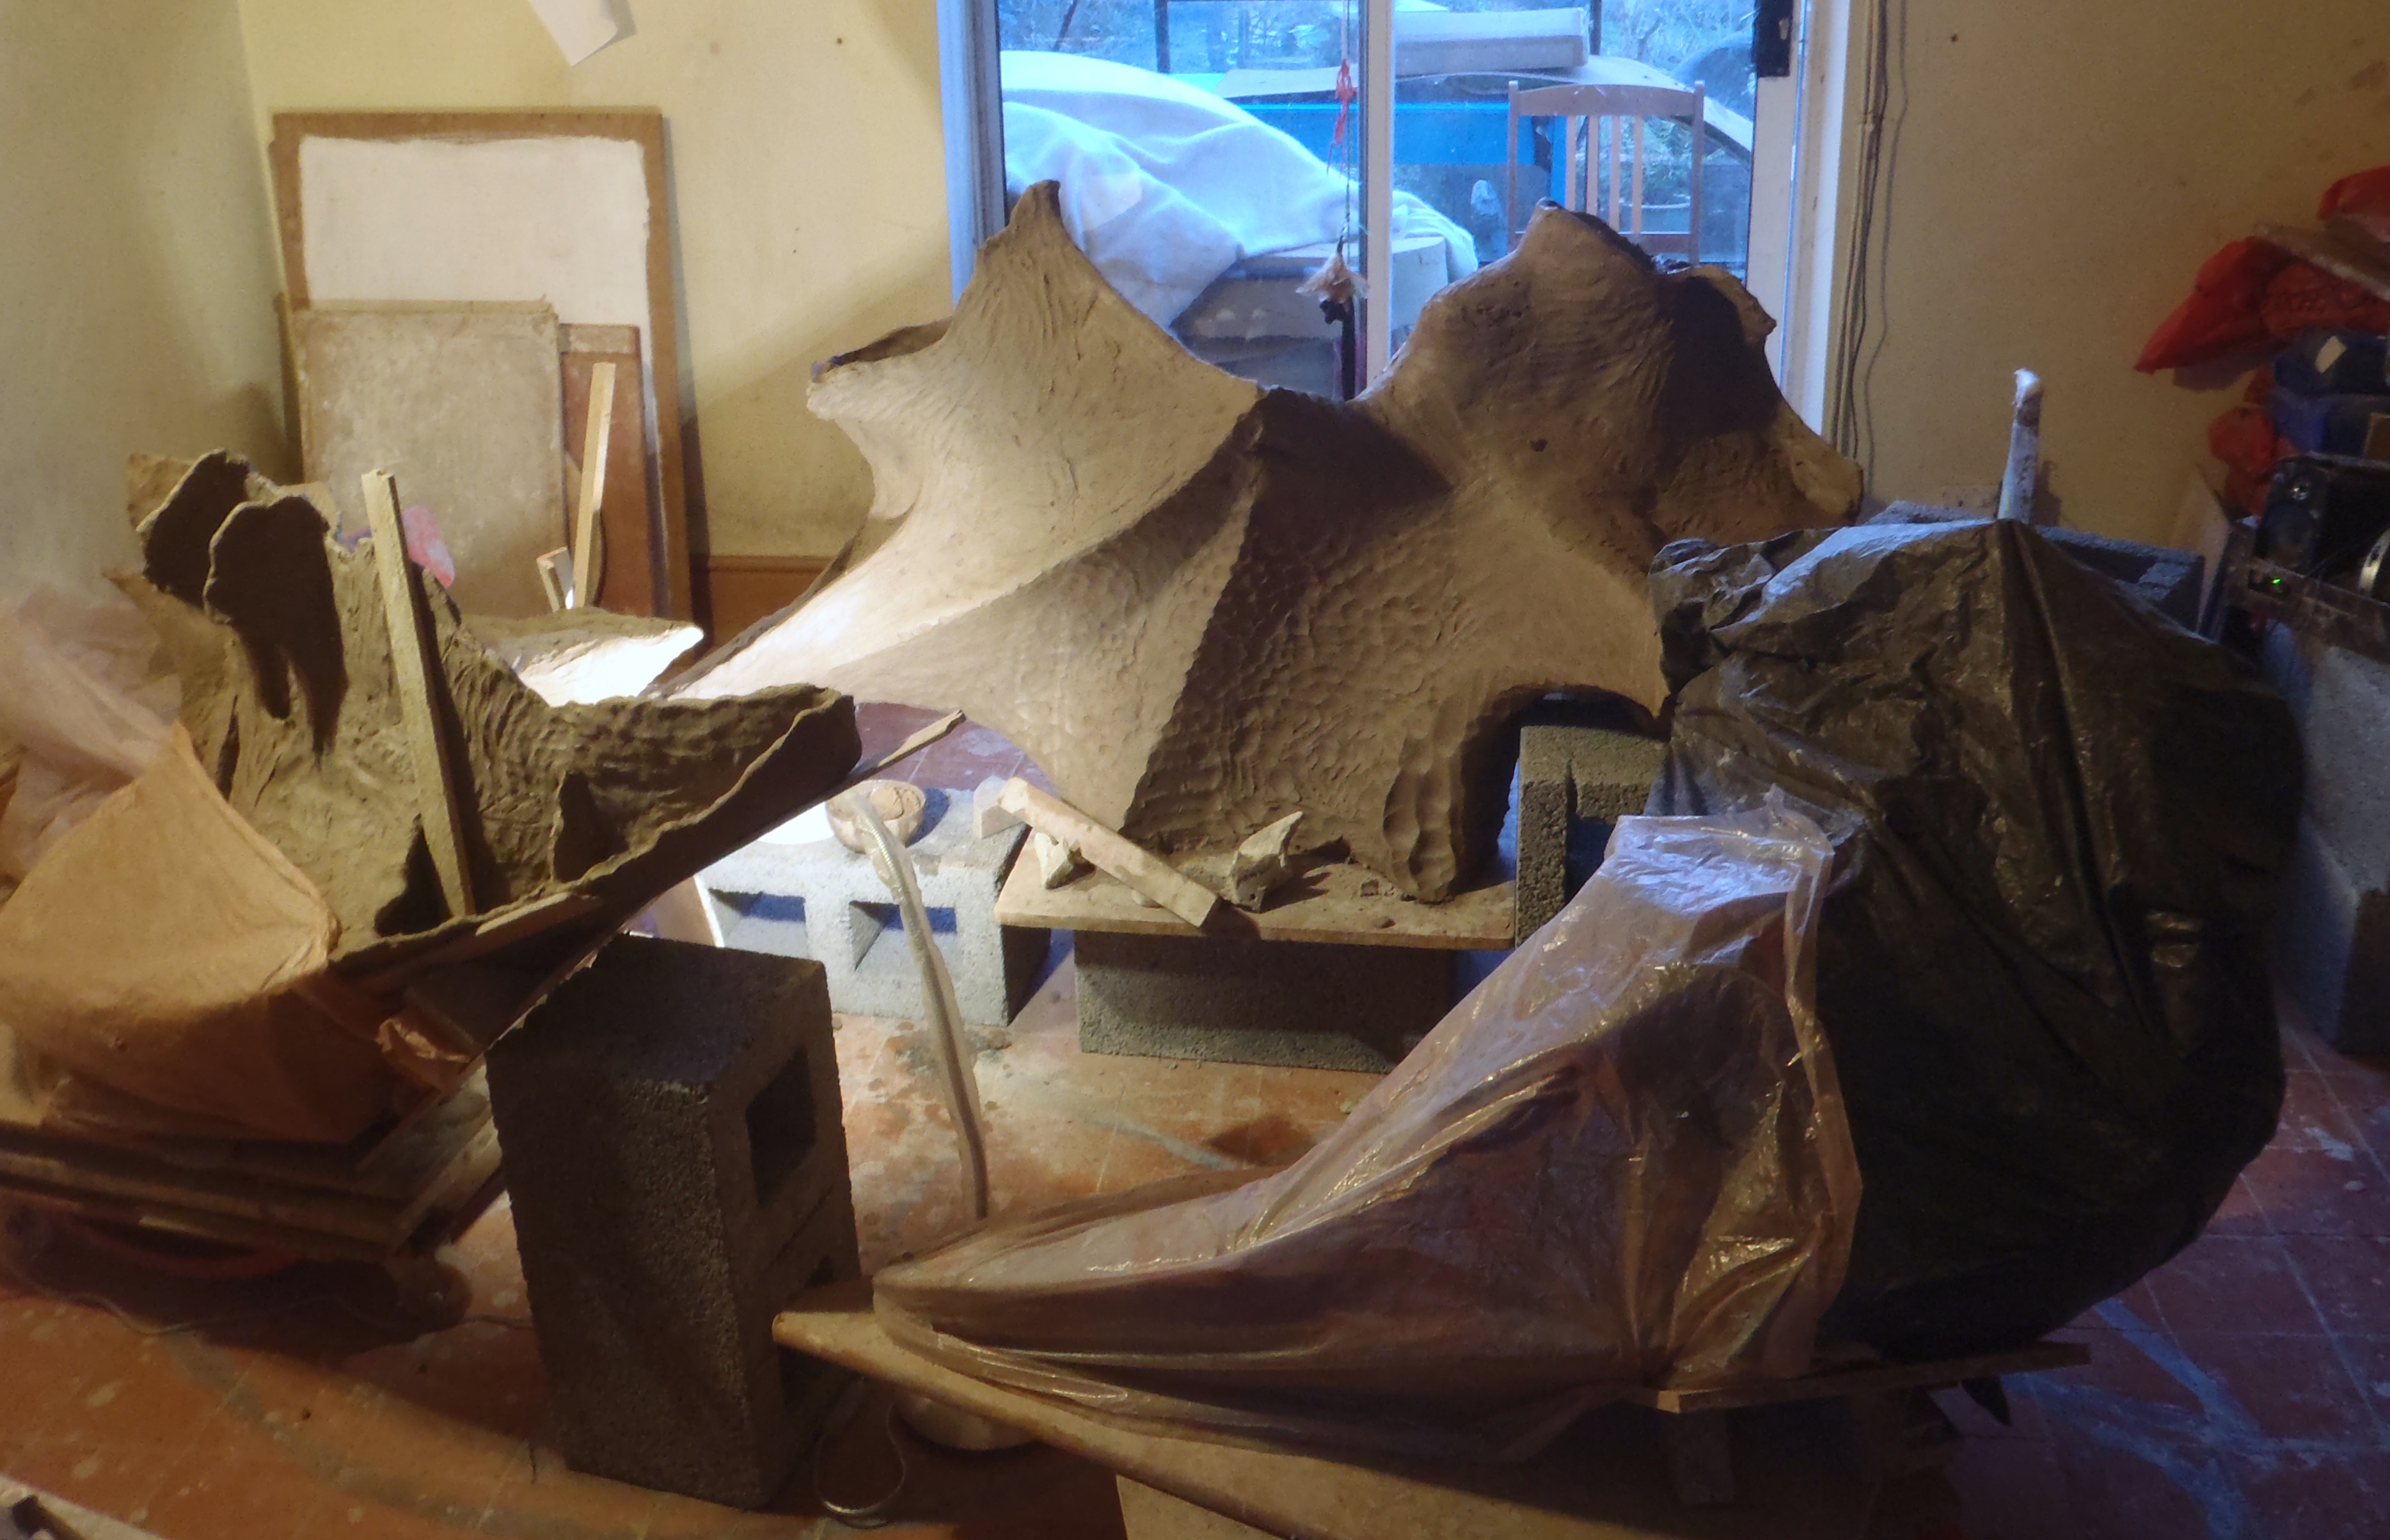
I always miss my wonderful Volunteers from past projects at this point. But it is a lot easier to be building in my own studio. Advancing decrepitude means some of my systems for moving heavy loads around lack dignity. And I can loose myself in the curves.
Areas are kept wrapped in plastic to keep the drying even. When you add new clay you need to allow time for the water to re-balance itself down the form. A large piece will be holding gallons of water.
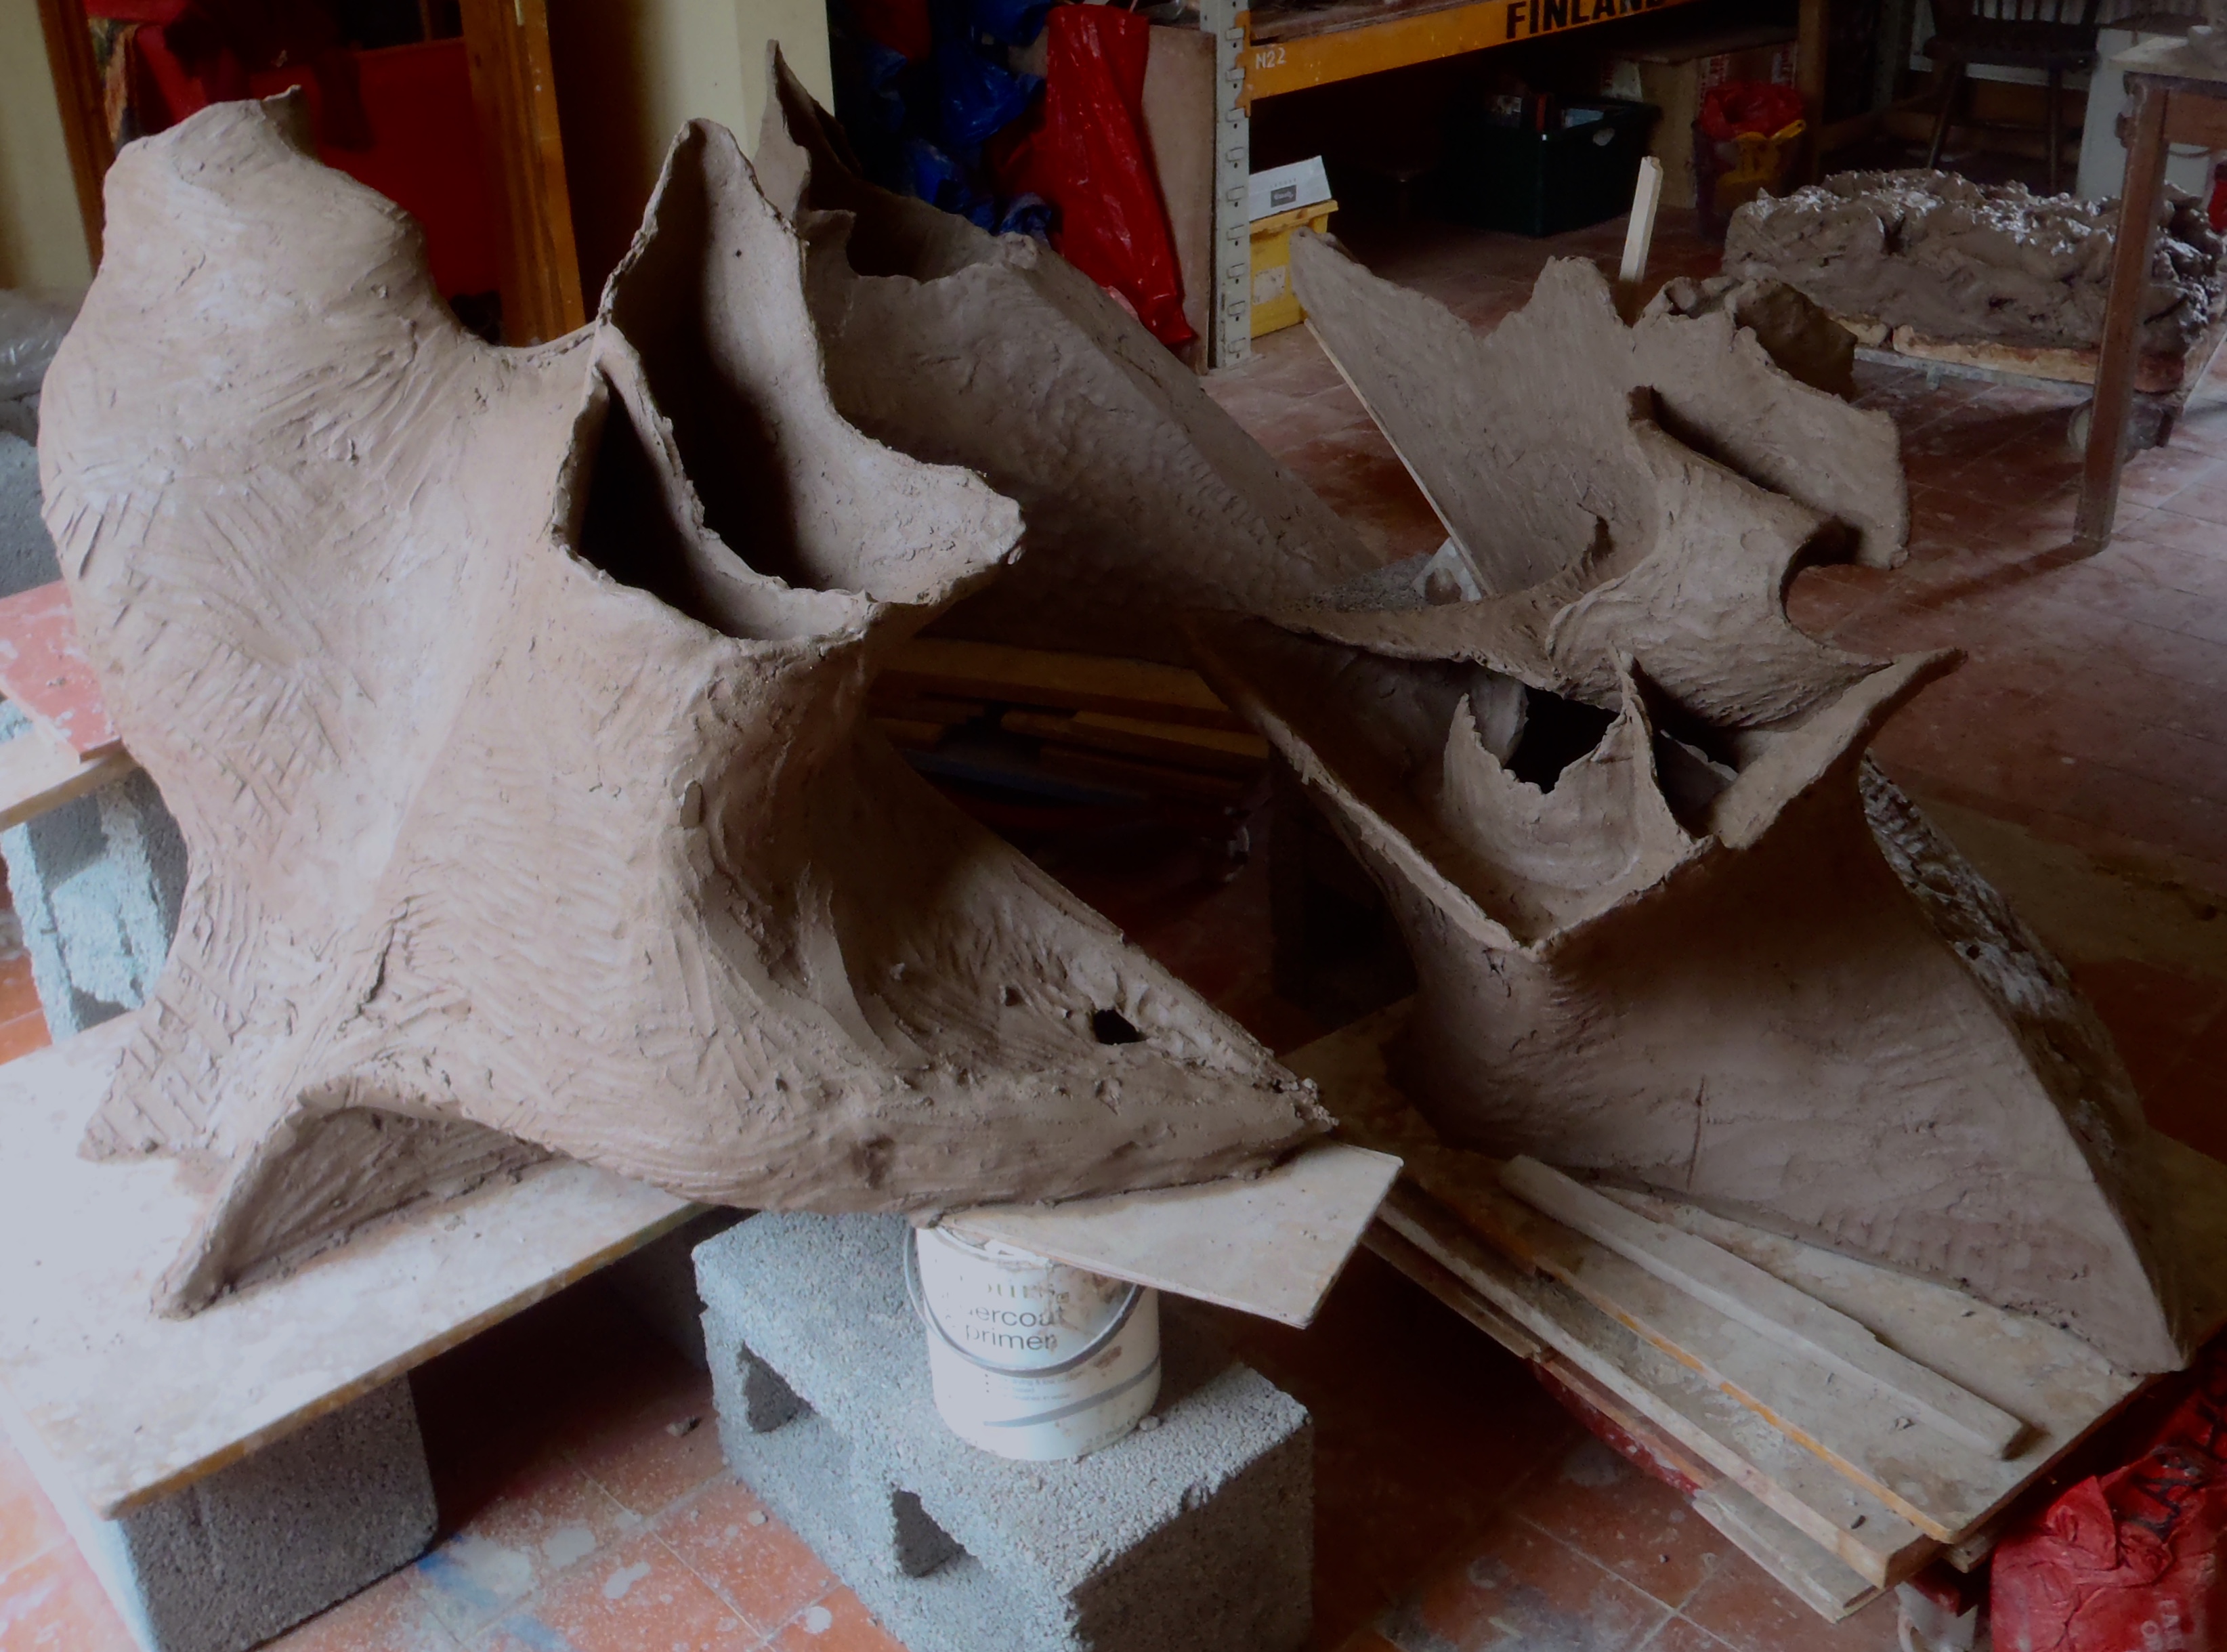
I am building the armature of the piece. The final surface will be added to it so I need to keep the clay at the best stage of hardness. Scarva ES50 Crank holds its water really well while still being very strong at the leather-hard stage.
I will be adding a lot of deep texture and modelling so these armature walls are very thin. In places the lines and curves of the final form are showing.
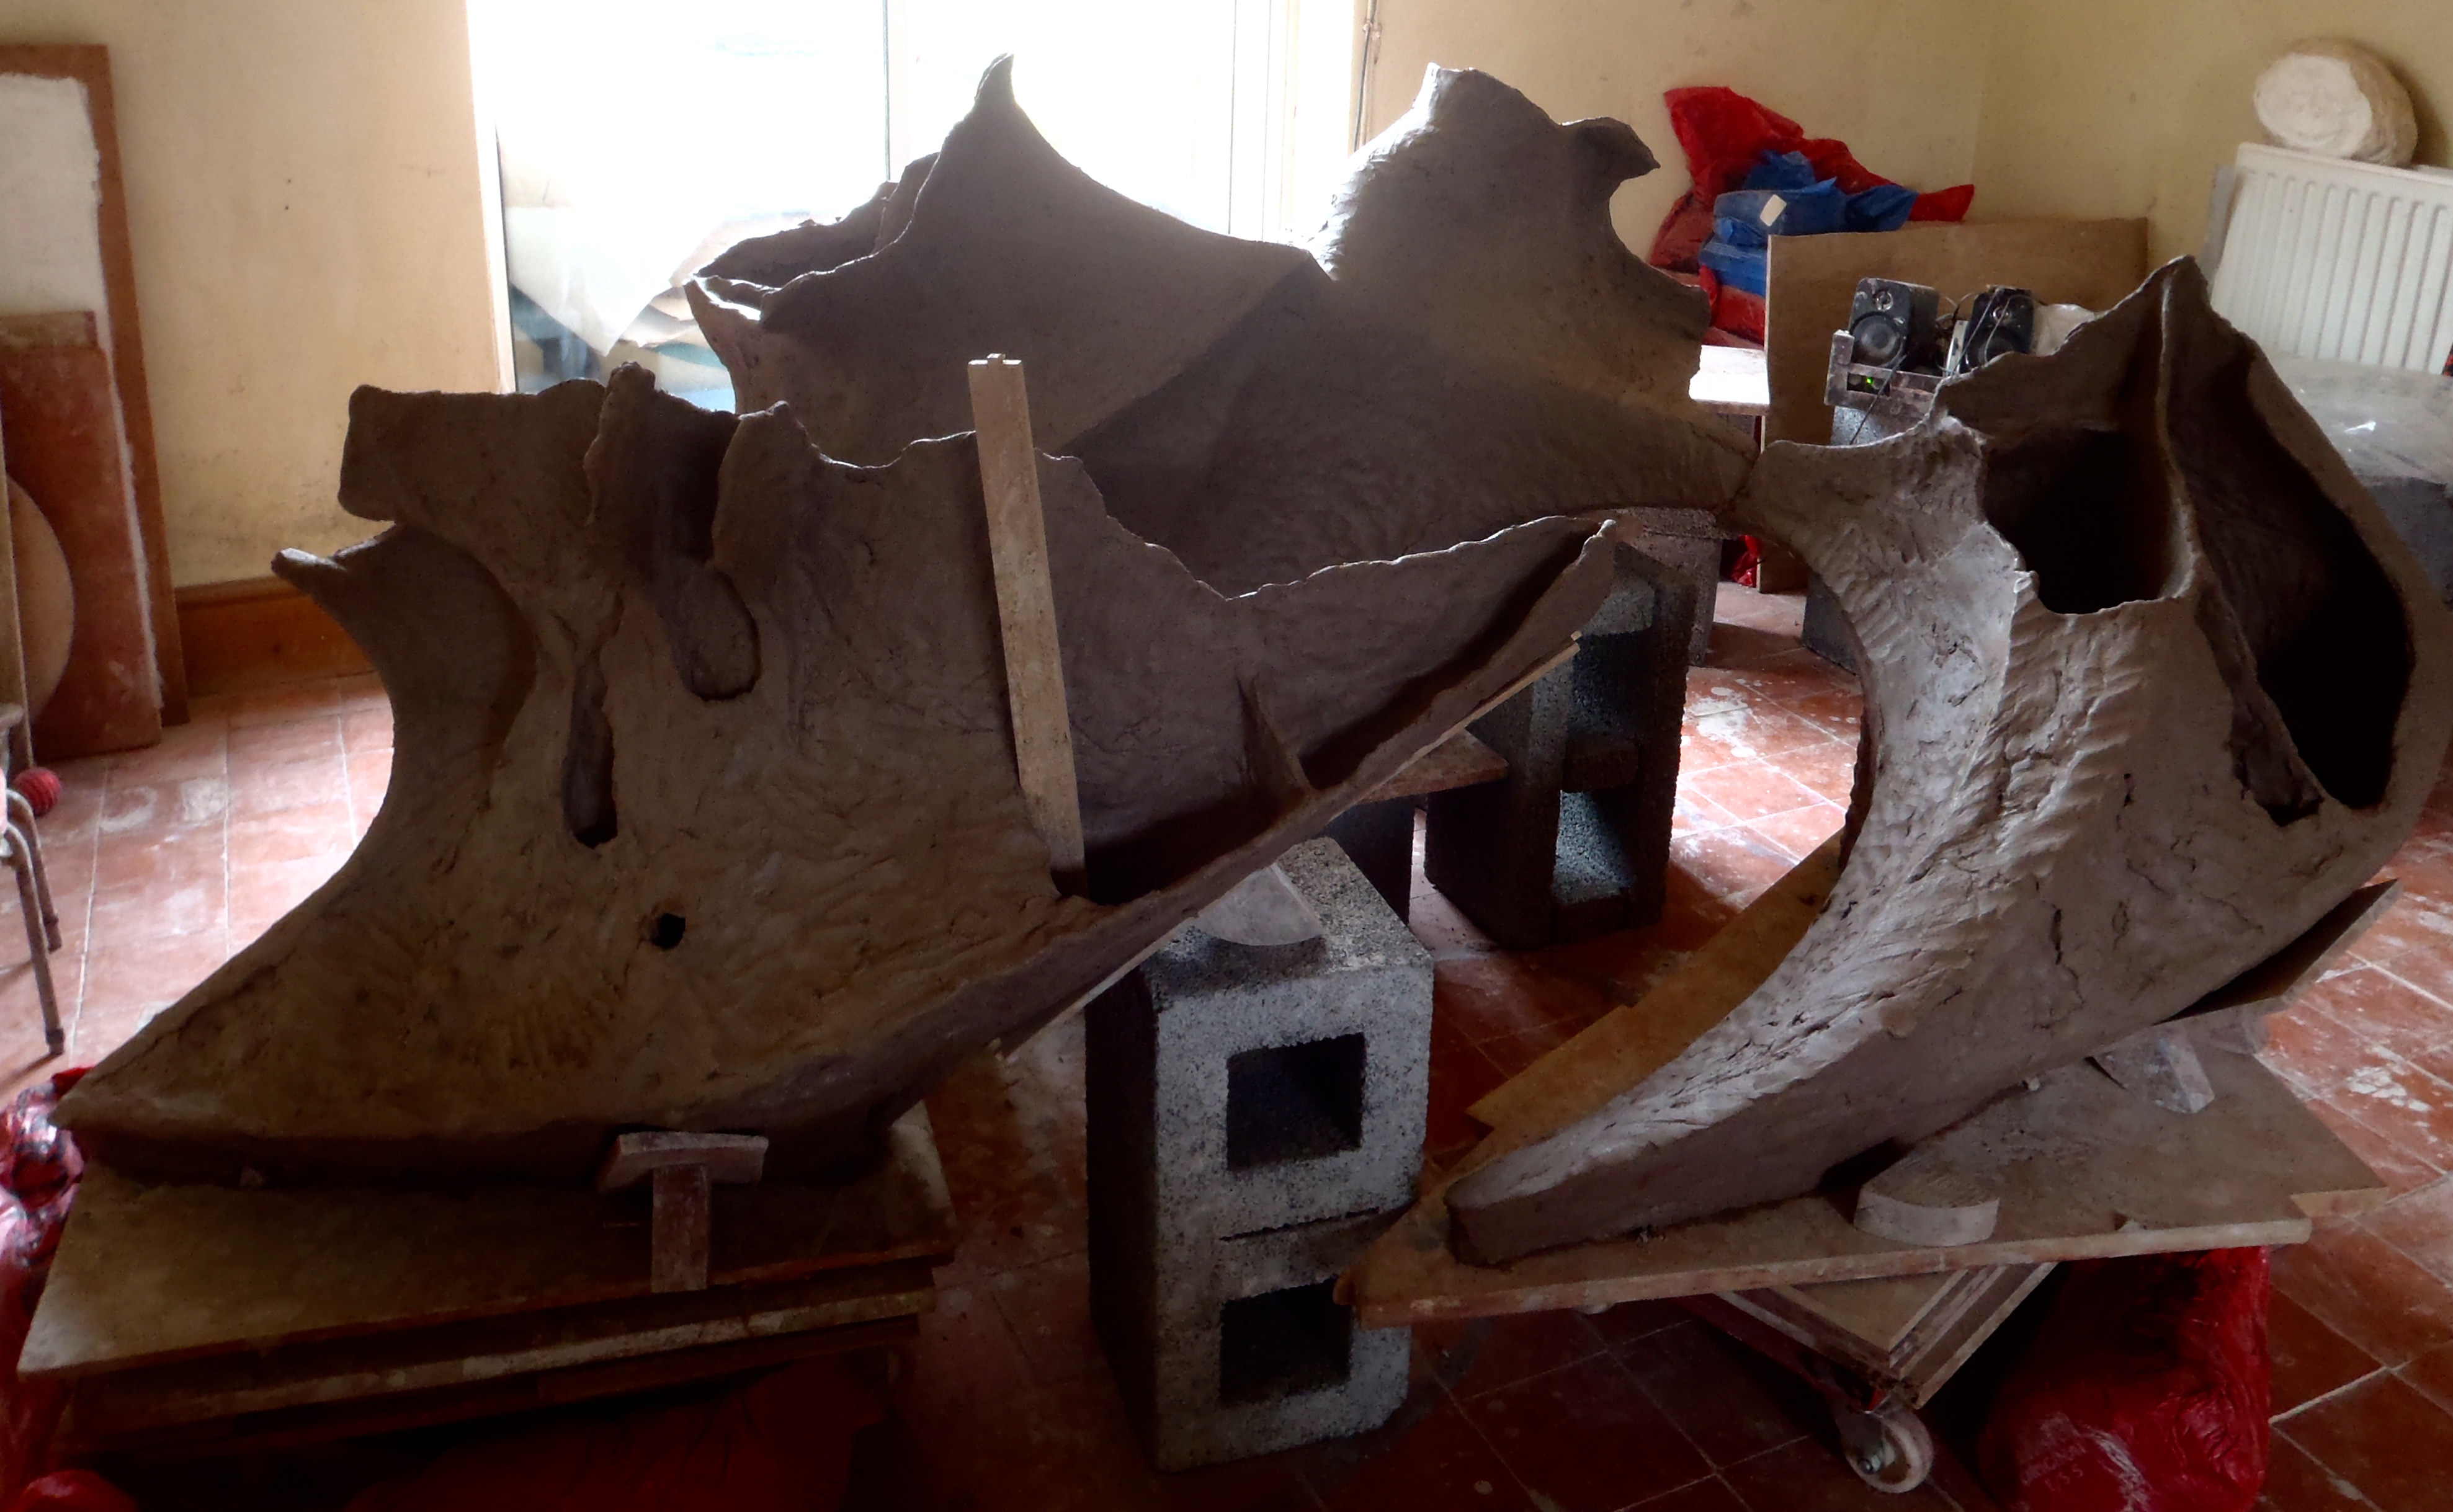
There is an internal support structure made of clay that will stay in place during the firing. It will help to support the sections when the sculpture is cut up so you need to plan them well in advance. Other materials like foam and wood are used inside just long enough for the clay to stiffen. External supports can be anything. They will need constant adjusting to accommodate shrinkage. I have a treasured collection of heavy-duty props and oddly shaped bits of wood and memory foam.
The lines of the supports can be distracting.
2/3 of the way up. But the forms are not complete, especially width-wise. You see the movement starting in the curves of the central space. I’m using the sound-track from The Legend of Korra to keep the theme consistent across the weeks of work.